beginner · 20 minutes · updated 2026-10-03
Take Custody of Your Bitcoin with Sparrow Wallet
Move your Bitcoin off exchanges and into a wallet you control, step by step, in about 20 minutes.
> what you'll need
- -A computer (Windows or Mac)
- -An internet connection
- -A small amount of Bitcoin to test with
All you need is a computer and an internet connection. By the end you will have a working wallet, a tested backup, and a real understanding of what you are holding.
1. Why self-custody matters
Bitcoin is the most scarce asset known to humanity
People are catching on. Countries are accumulating Bitcoin as a strategic reserve, major financial institutions are offering Bitcoin-collateralized products, and Bitcoin ETFs are among the fastest-growing ETFs in history. Everybody who understands Bitcoin is chasing it relentlessly, and you need to protect what is yours, starting with controlling your own Bitcoin.

What makes Bitcoin different
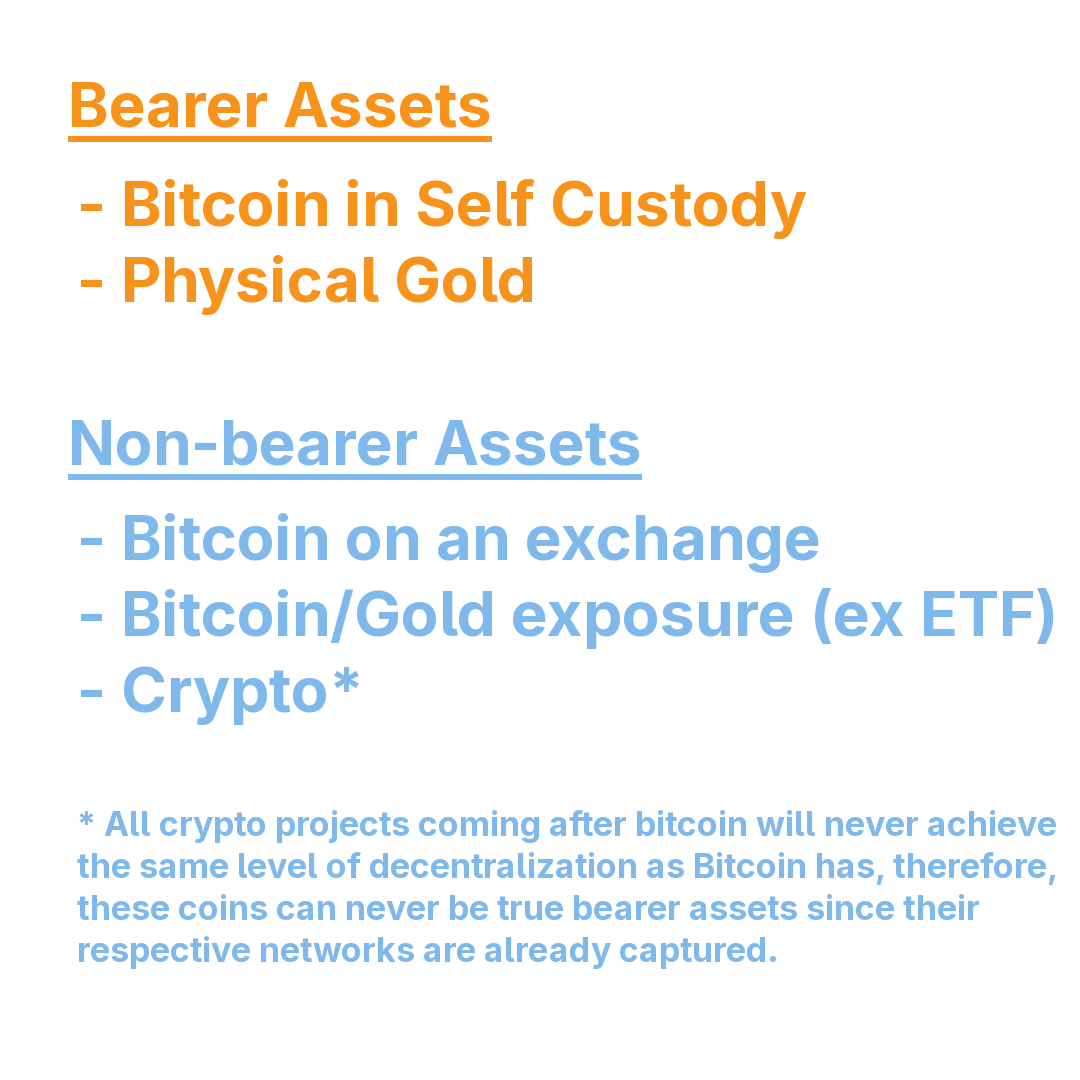
Bitcoin, unlike the plethora of other coins, is truly decentralized, which makes it a real bearer asset. A bearer asset is something that can be fully controlled and owned by an individual.
For example, physical gold is a bearer asset, but shares of a gold ETF are not. Bitcoin works the same way. You can leave it on an exchange, trusting Coinbase or Kraken to hold it for you. Or you can take self-custody, where the Bitcoin is yours and no one can take it, freeze it, or lose it.
Why this matters right now
As Bitcoin's value increases, so do the lengths bad actors will go to get a hold of it. There will only ever be 21 million Bitcoin. It is much better to take control of your coins while you can, but do not just take our word for it. Ask those who left their Bitcoin on FTX or Mt. Gox when they went under.
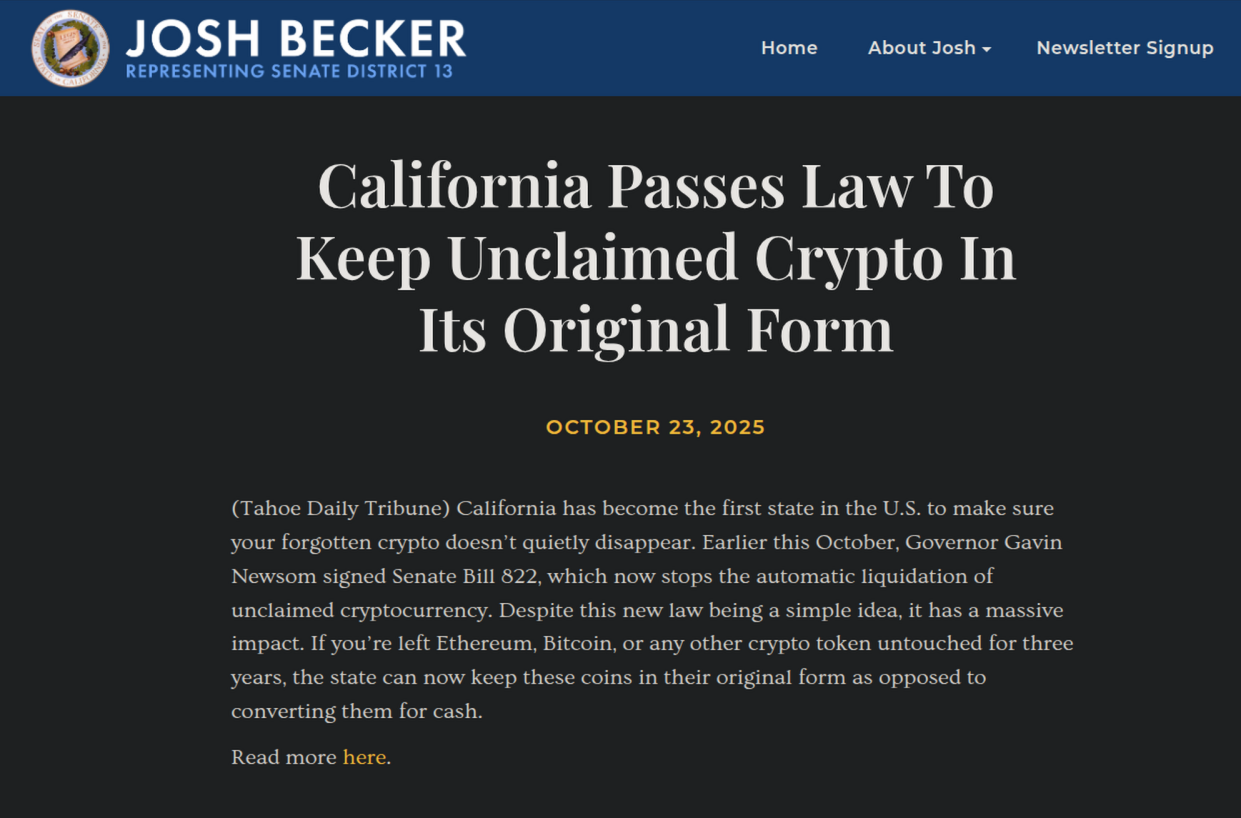
Unfortunately, it is not just failing exchanges we need to worry about. In October 2025, California passed a law allowing the state to seize "unclaimed" Bitcoin on exchanges.
> warning
Not your keys, not your coins. This guide will show you how to hold your own keys in a Sparrow Bitcoin wallet.
2. Download Sparrow
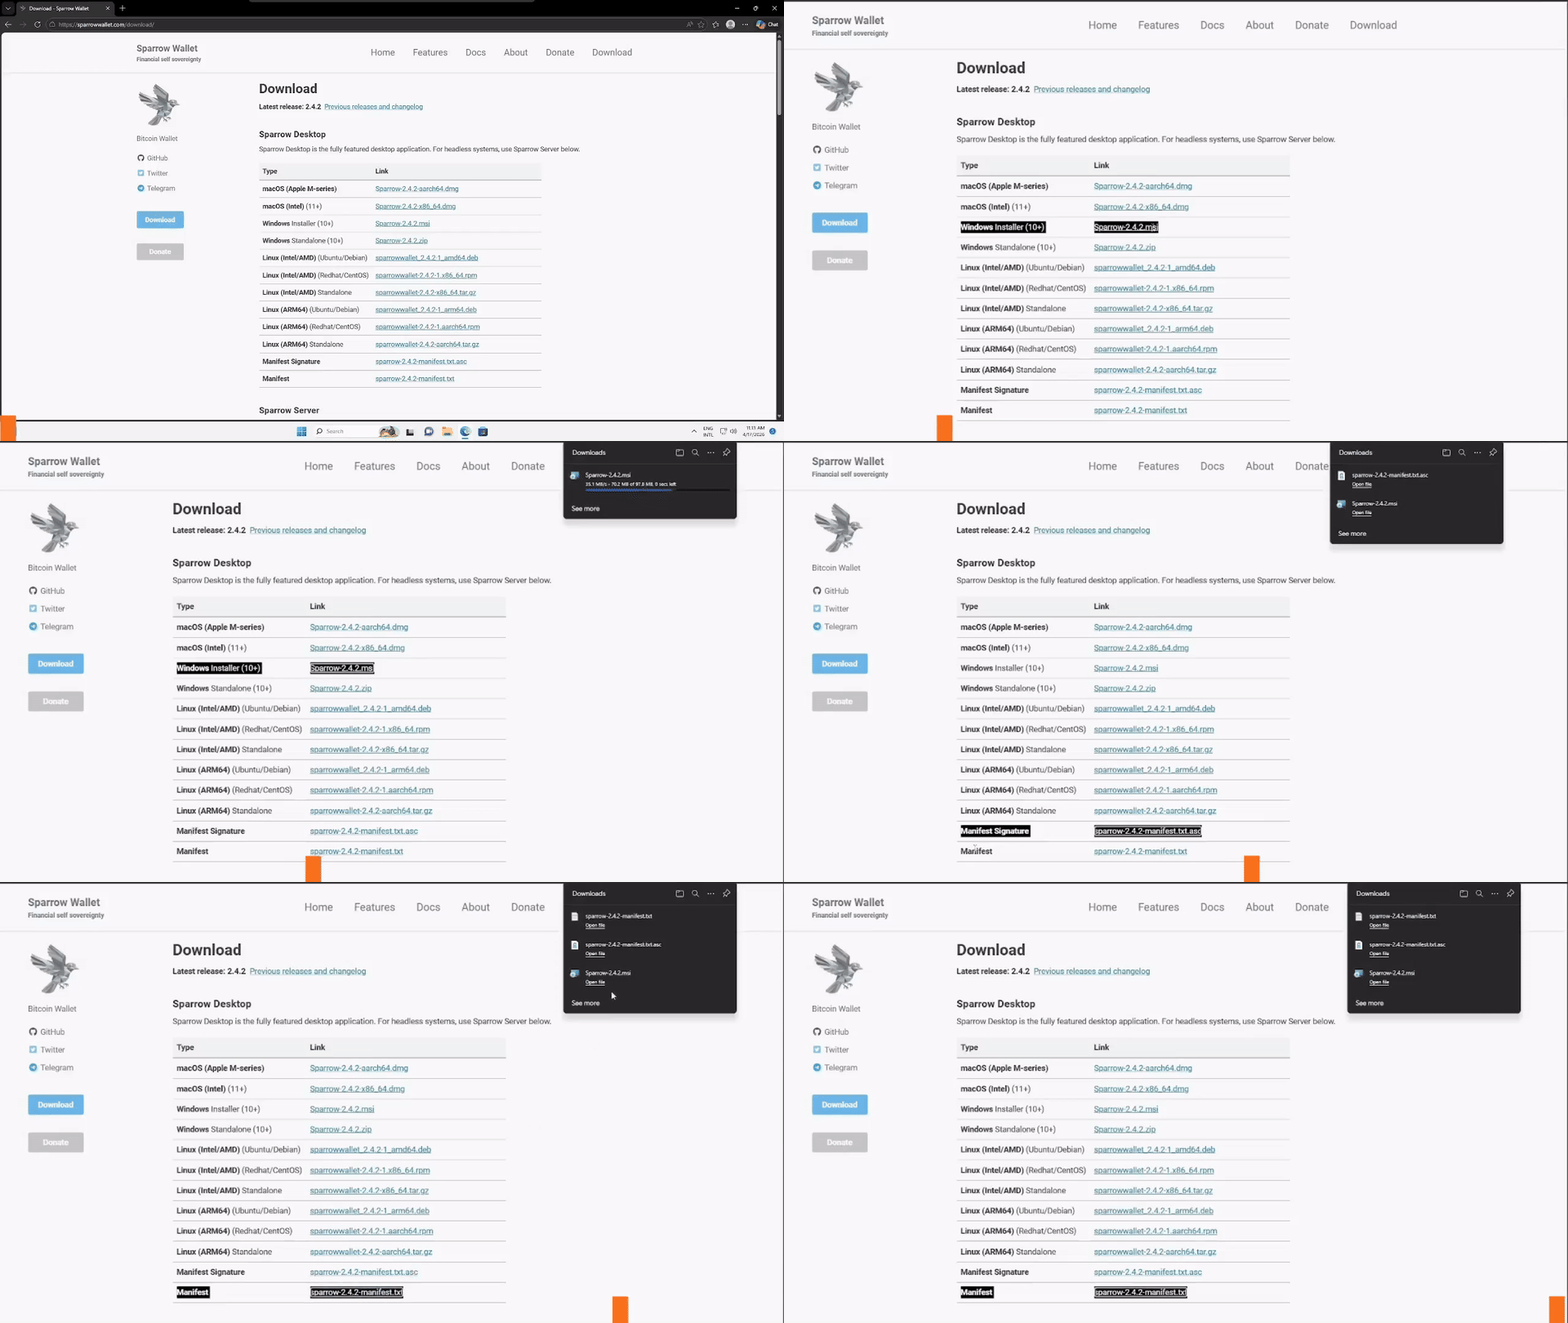
Go to the Sparrow Wallet downloads page. You need to download three files: the installer, the manifest, and the manifest signature. The first is the installer; the other two are used to verify it. Do not install Sparrow until you verify the installer.
Download the Windows Installer (10+) (.msi) file, plus the Manifest file (.txt) and the Manifest signature file (.txt.asc).
Once all three files are in your Downloads folder, move on.
3. Verify the download
Sparrow is a program that holds your money, so you should confirm the file you downloaded is the real thing before you run it.
Check for GPG
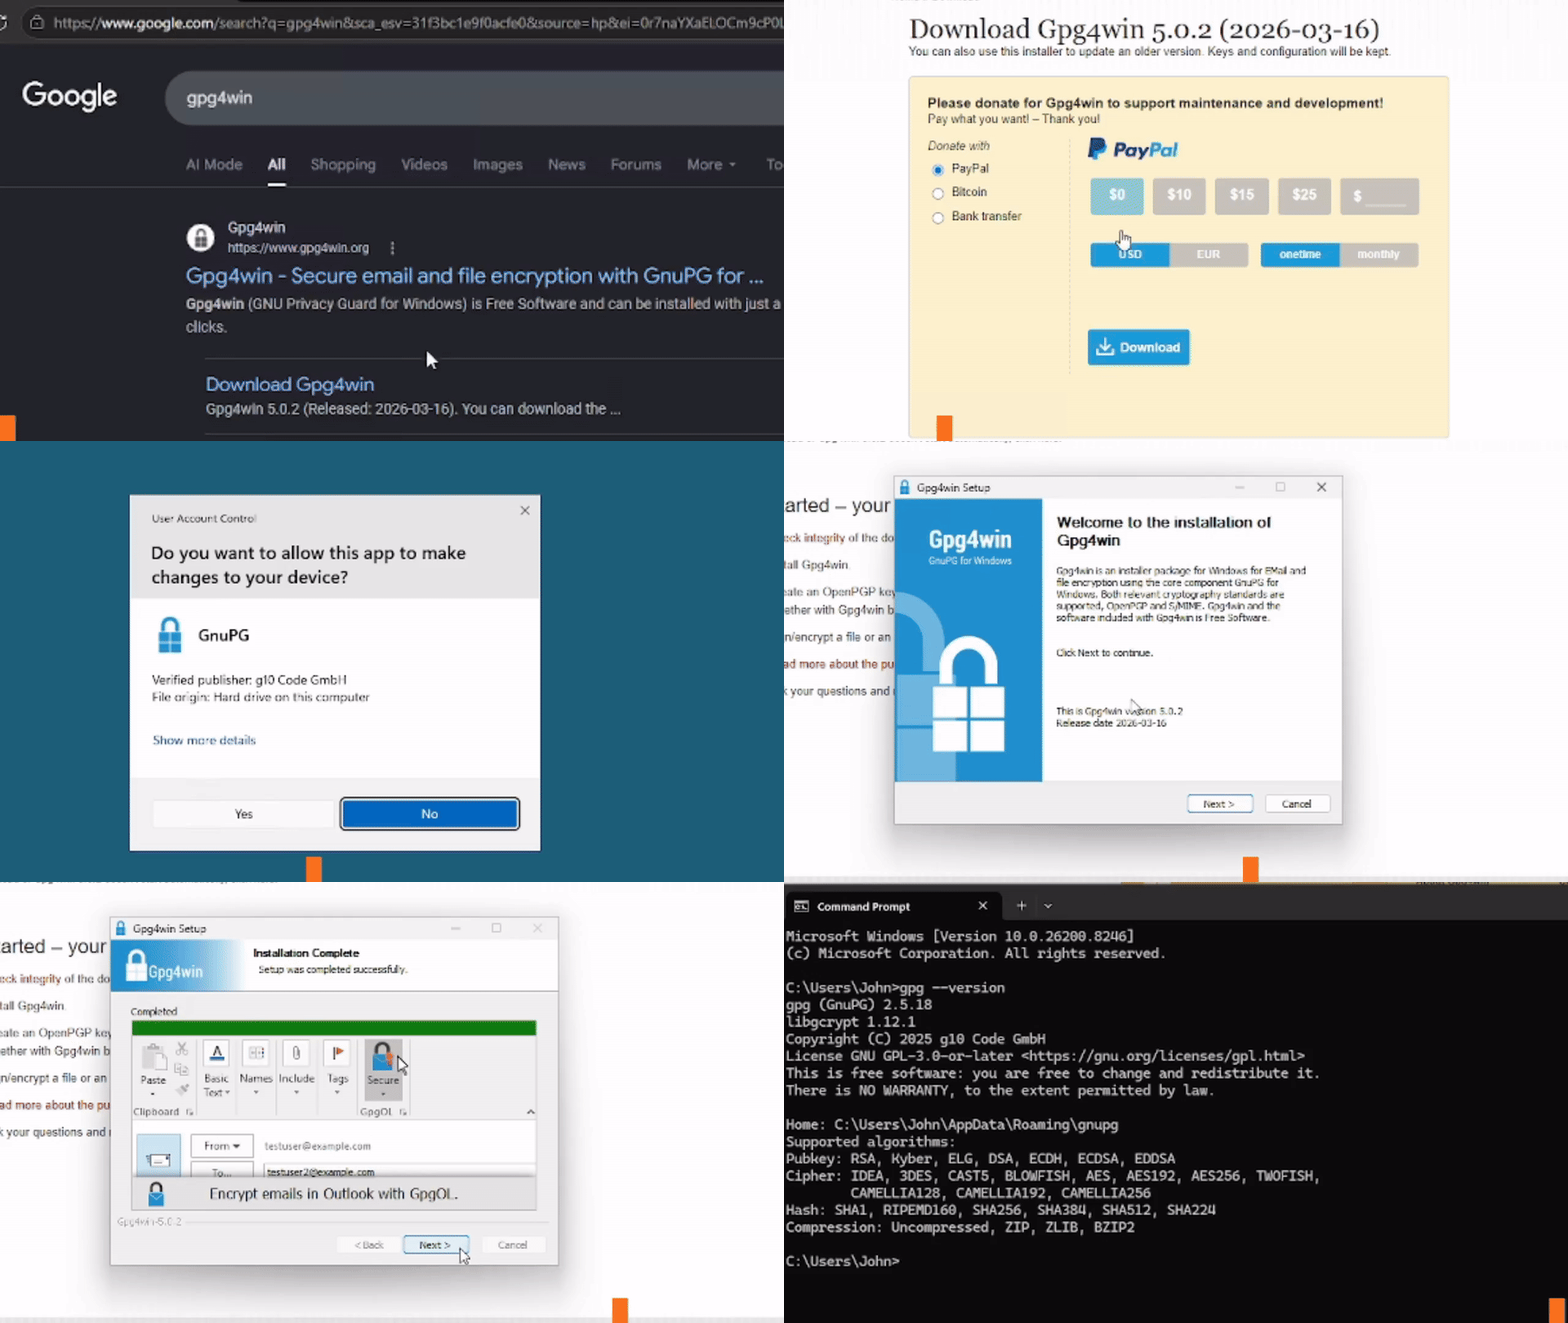
First, check whether you already have GPG installed.
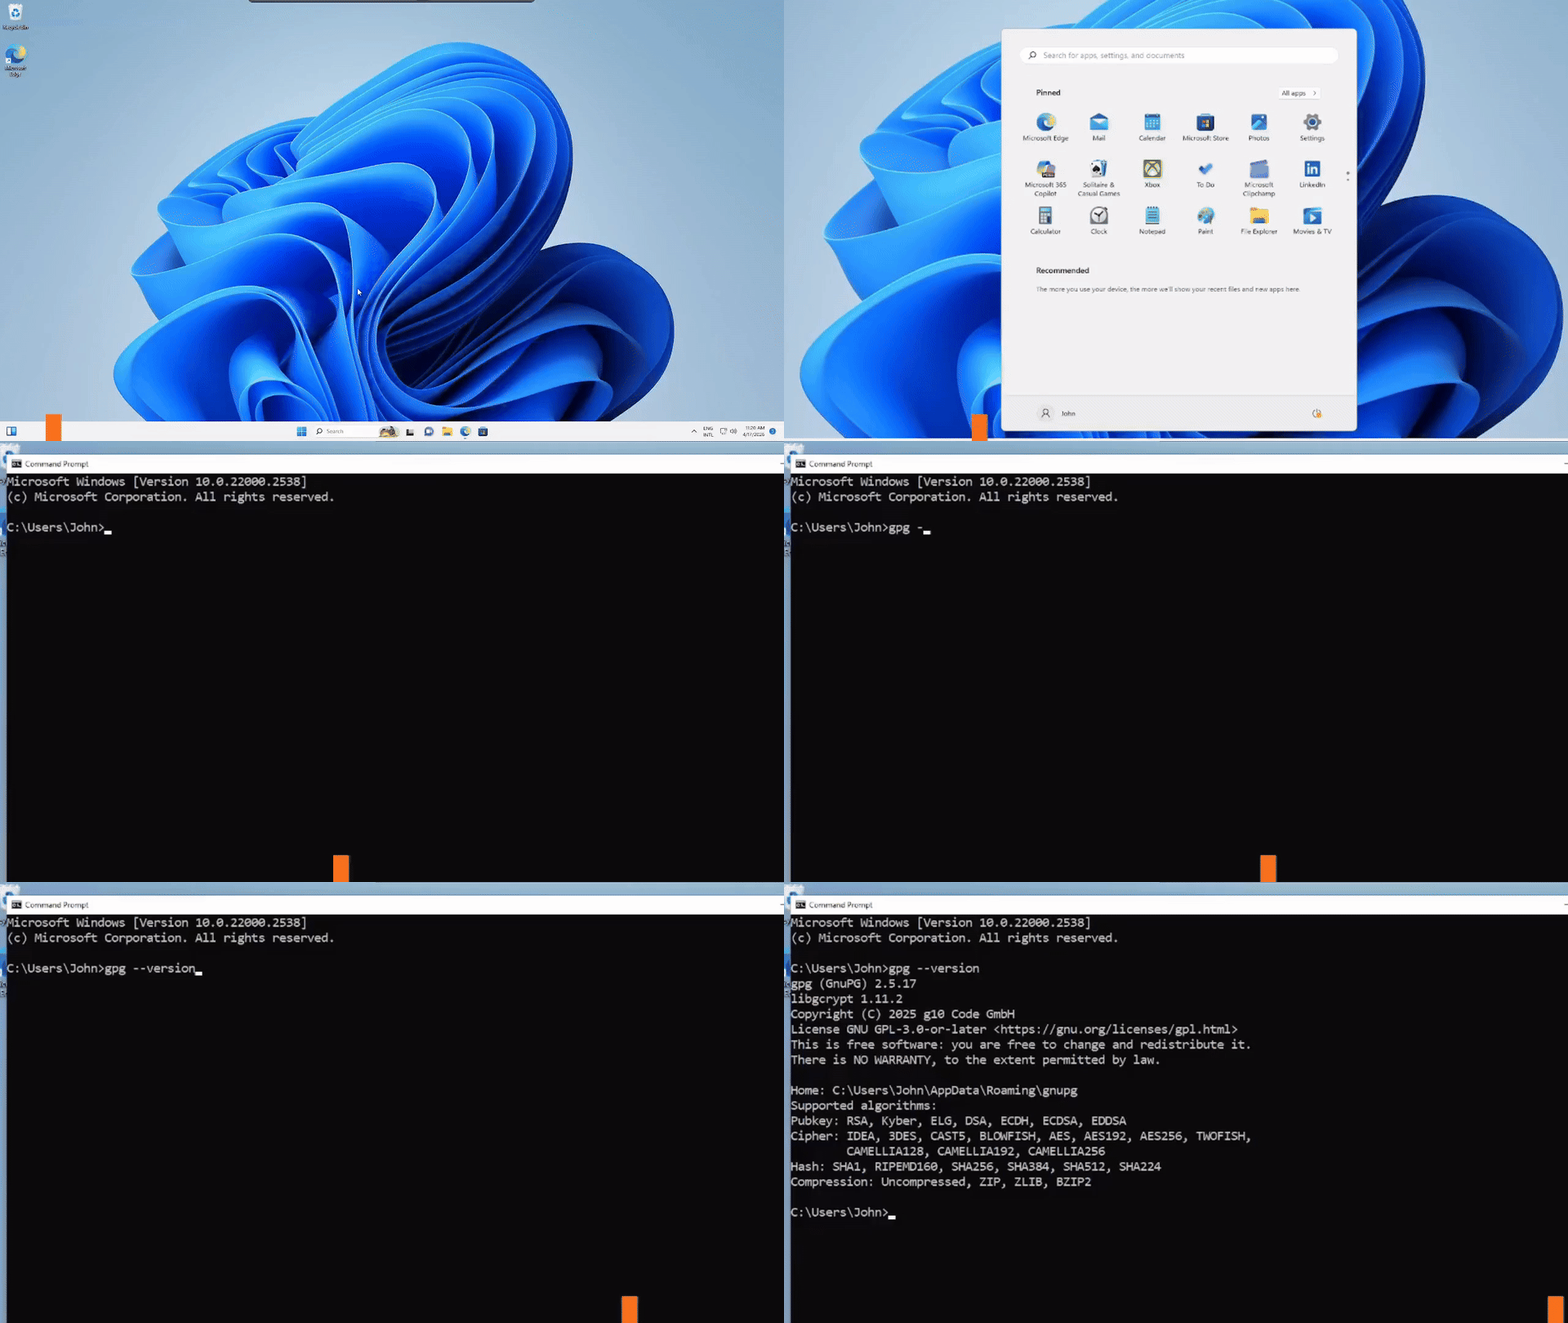
Open Command Prompt (Win + R, type cmd, hit Enter) and run:
gpg --version
If you see version info, you are good. Skip past the optional install step below.
(Optional) Install GPG
If the command was not found, install GPG.
Go to gpg4win.org and click the big green download button. You will be asked to donate; $0 is valid.
Download the installer, run it, and click Next through the defaults. Once it finishes, close Command Prompt and open a fresh one, then verify:
gpg --version
Import Craig Raw's GPG key
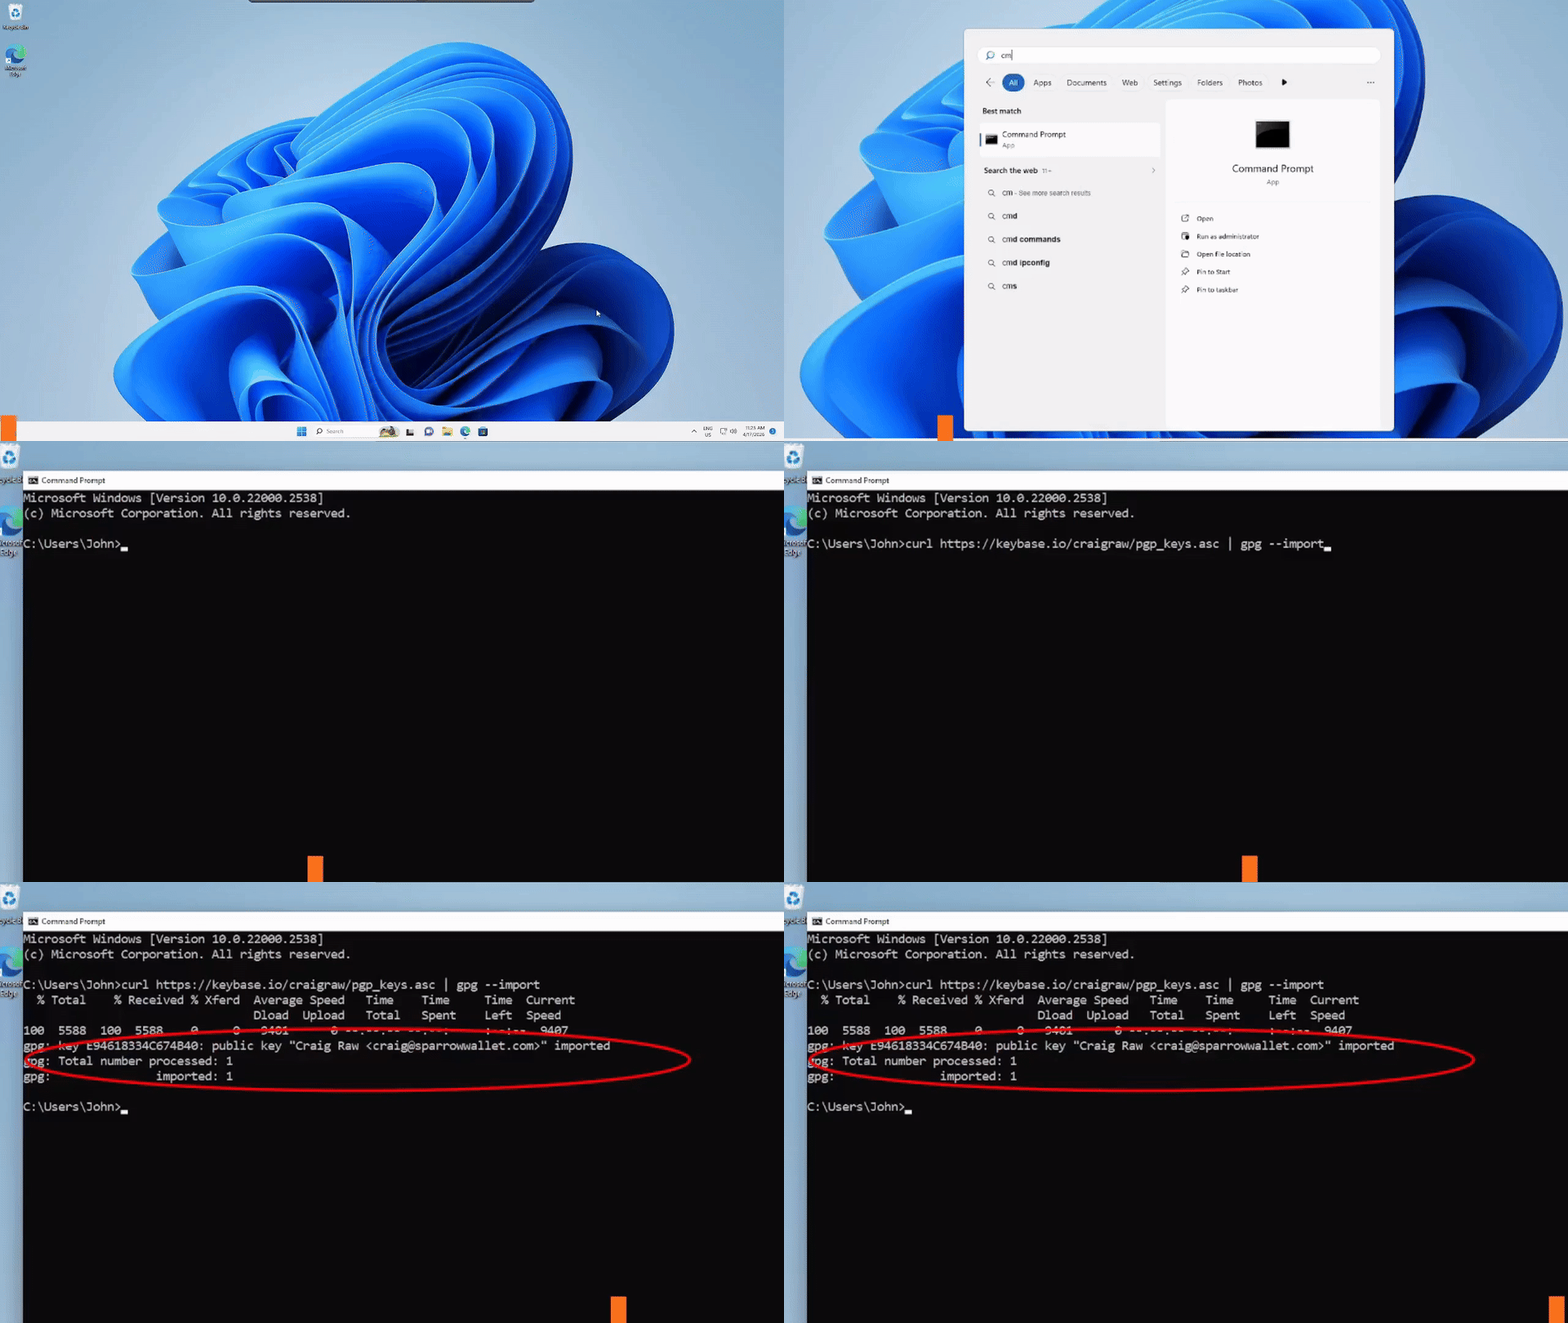
Now import the Sparrow developer's public key so we can verify signatures.
curl https://keybase.io/craigraw/pgp_keys.asc | gpg --import
You should see a message confirming the key was imported.
Verify the manifest
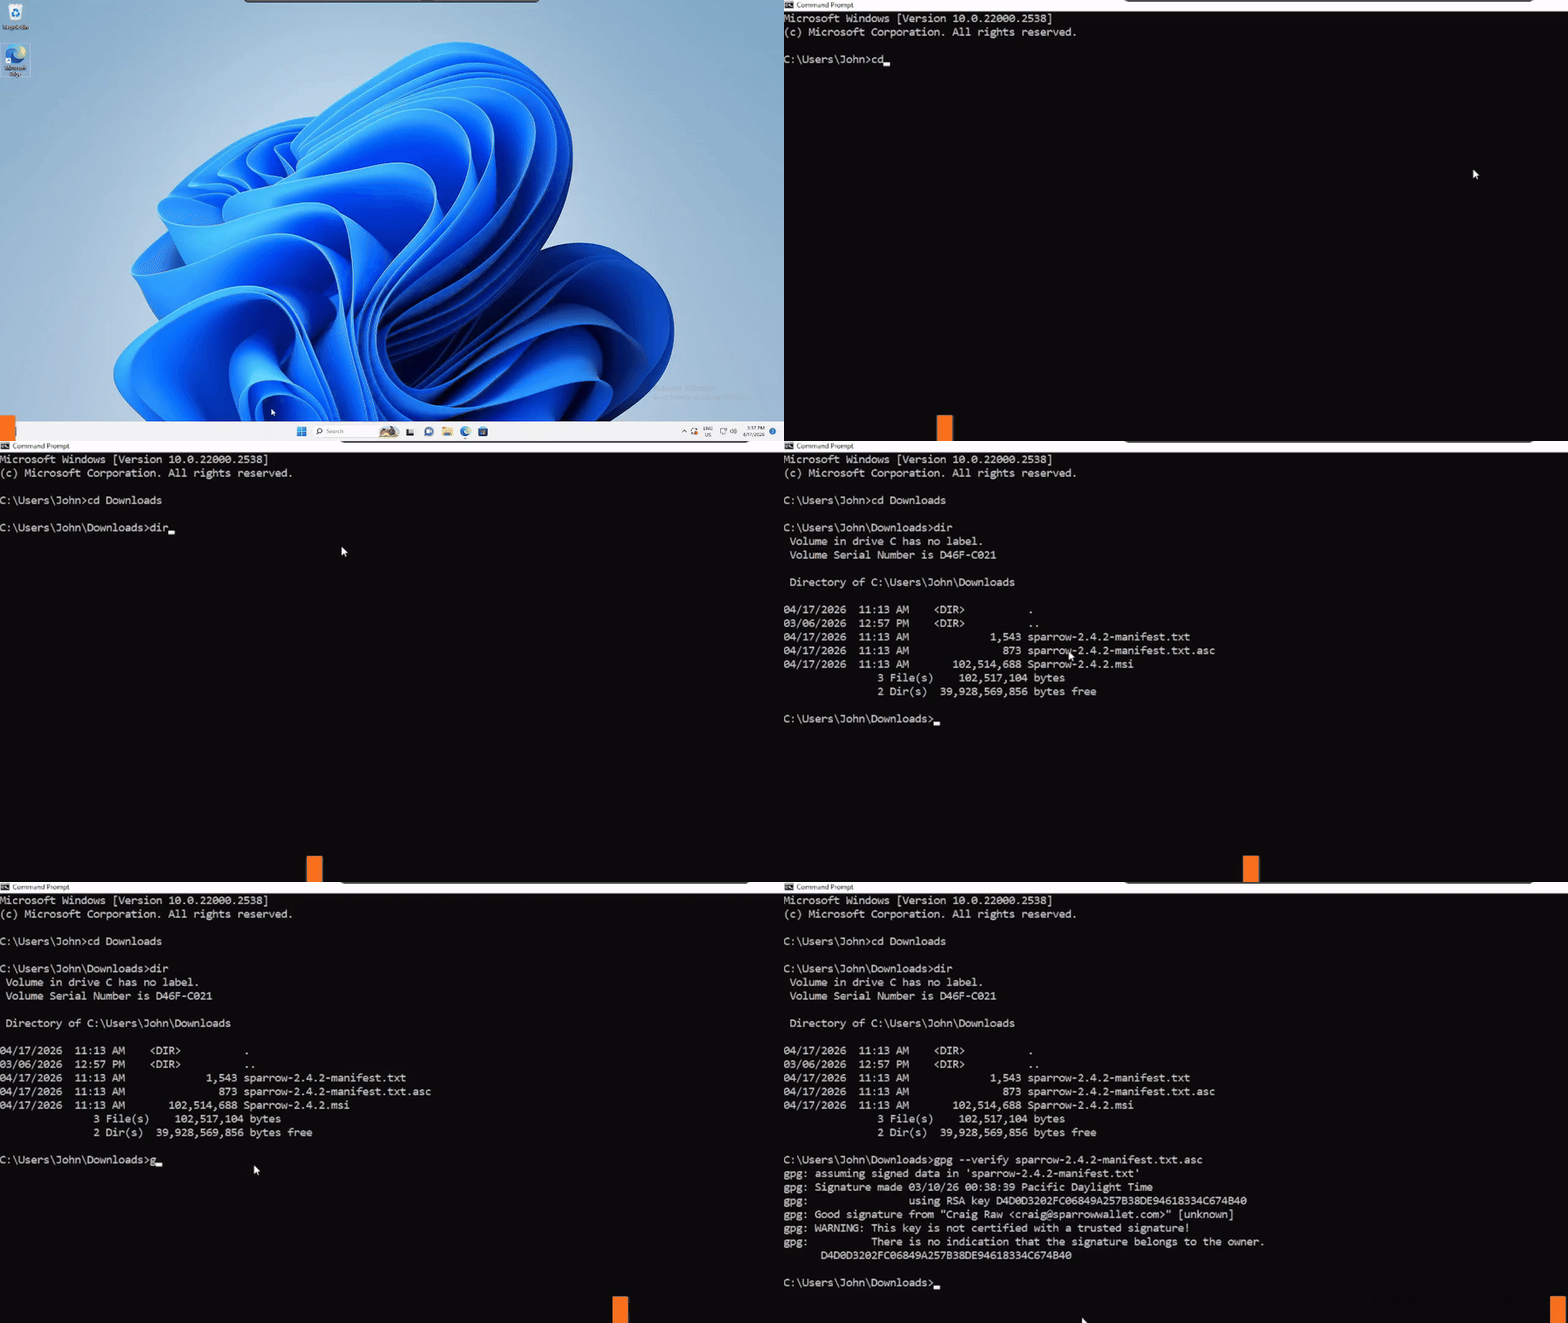
Now verify the manifest file is authentic with the key you just imported. Open a fresh terminal, go to Downloads, and run:
cd Downloads
gpg --verify sparrow-2.4.2-manifest.txt.asc
If you see a "Good signature" confirmation, the manifest is authentic. You can ignore any "key not trusted" warnings.
Verify Sparrow
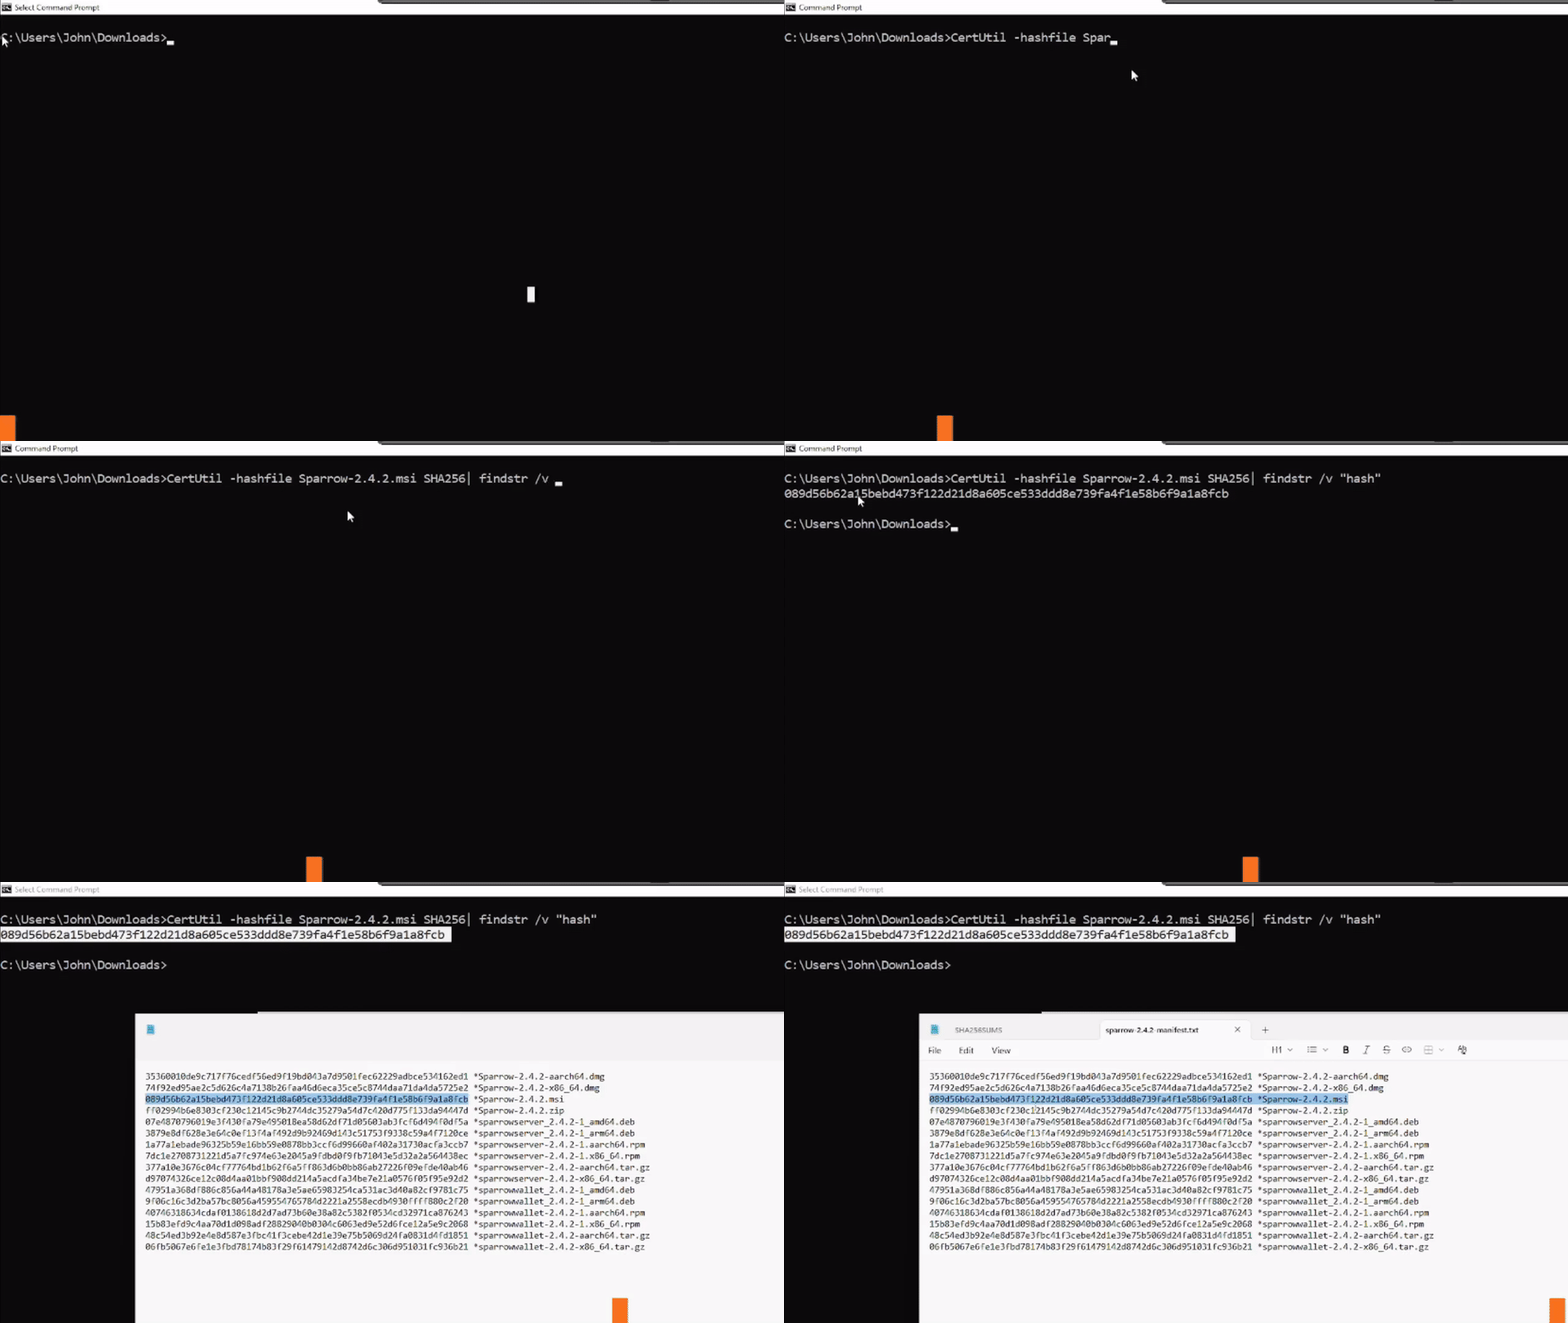
Last, calculate the hash of the installer and compare it to the manifest. If they match, the installer is authentic.
From the Downloads folder, run:
CertUtil -hashfile Sparrow-2.4.2.msi SHA256 | findstr /v "hash"
Compare the output to the hash in sparrow-2.4.2-manifest.txt. If they match, you are good.
4. Install and configure Sparrow
Install Sparrow
- Double-click the
.msifile you downloaded. - Follow the prompts. The defaults are fine.
- Launch Sparrow from your Start menu and press Next a few times.
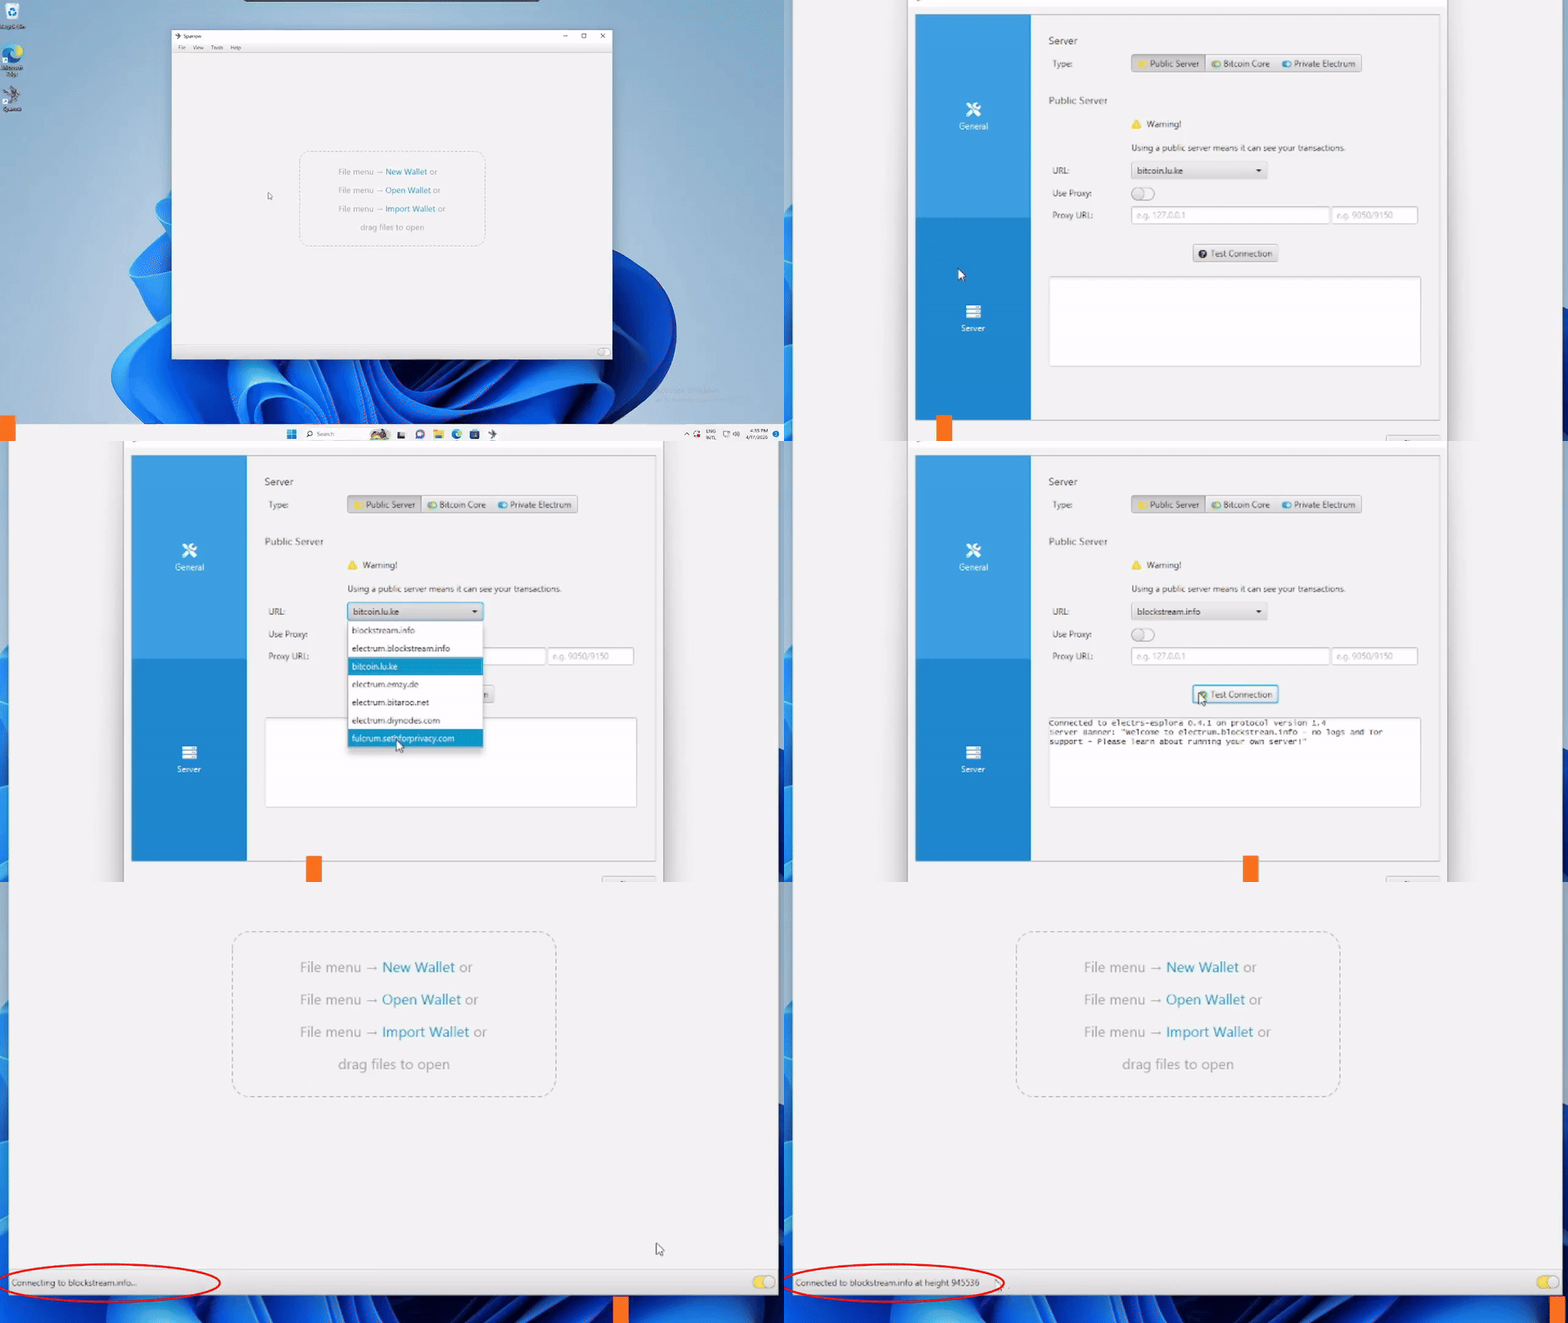
- When you reach the screen about configuring your Electrum server, select Later or Offline Mode. We will set this up in the next step.
That is it. Sparrow is installed and ready to go.
Configure Sparrow
Sparrow needs to connect to the Bitcoin network to work.
- Click File > Settings, then select the Server tab on the left sidebar.
- Make sure Public Server is selected. You will see a list of public servers.
- Pick one and click Test Connection.
If everything works, you will see a message confirming you are connected and showing the current block height. That means Sparrow is synced with the Bitcoin network.
5. Create a wallet and back it up
Create your wallet
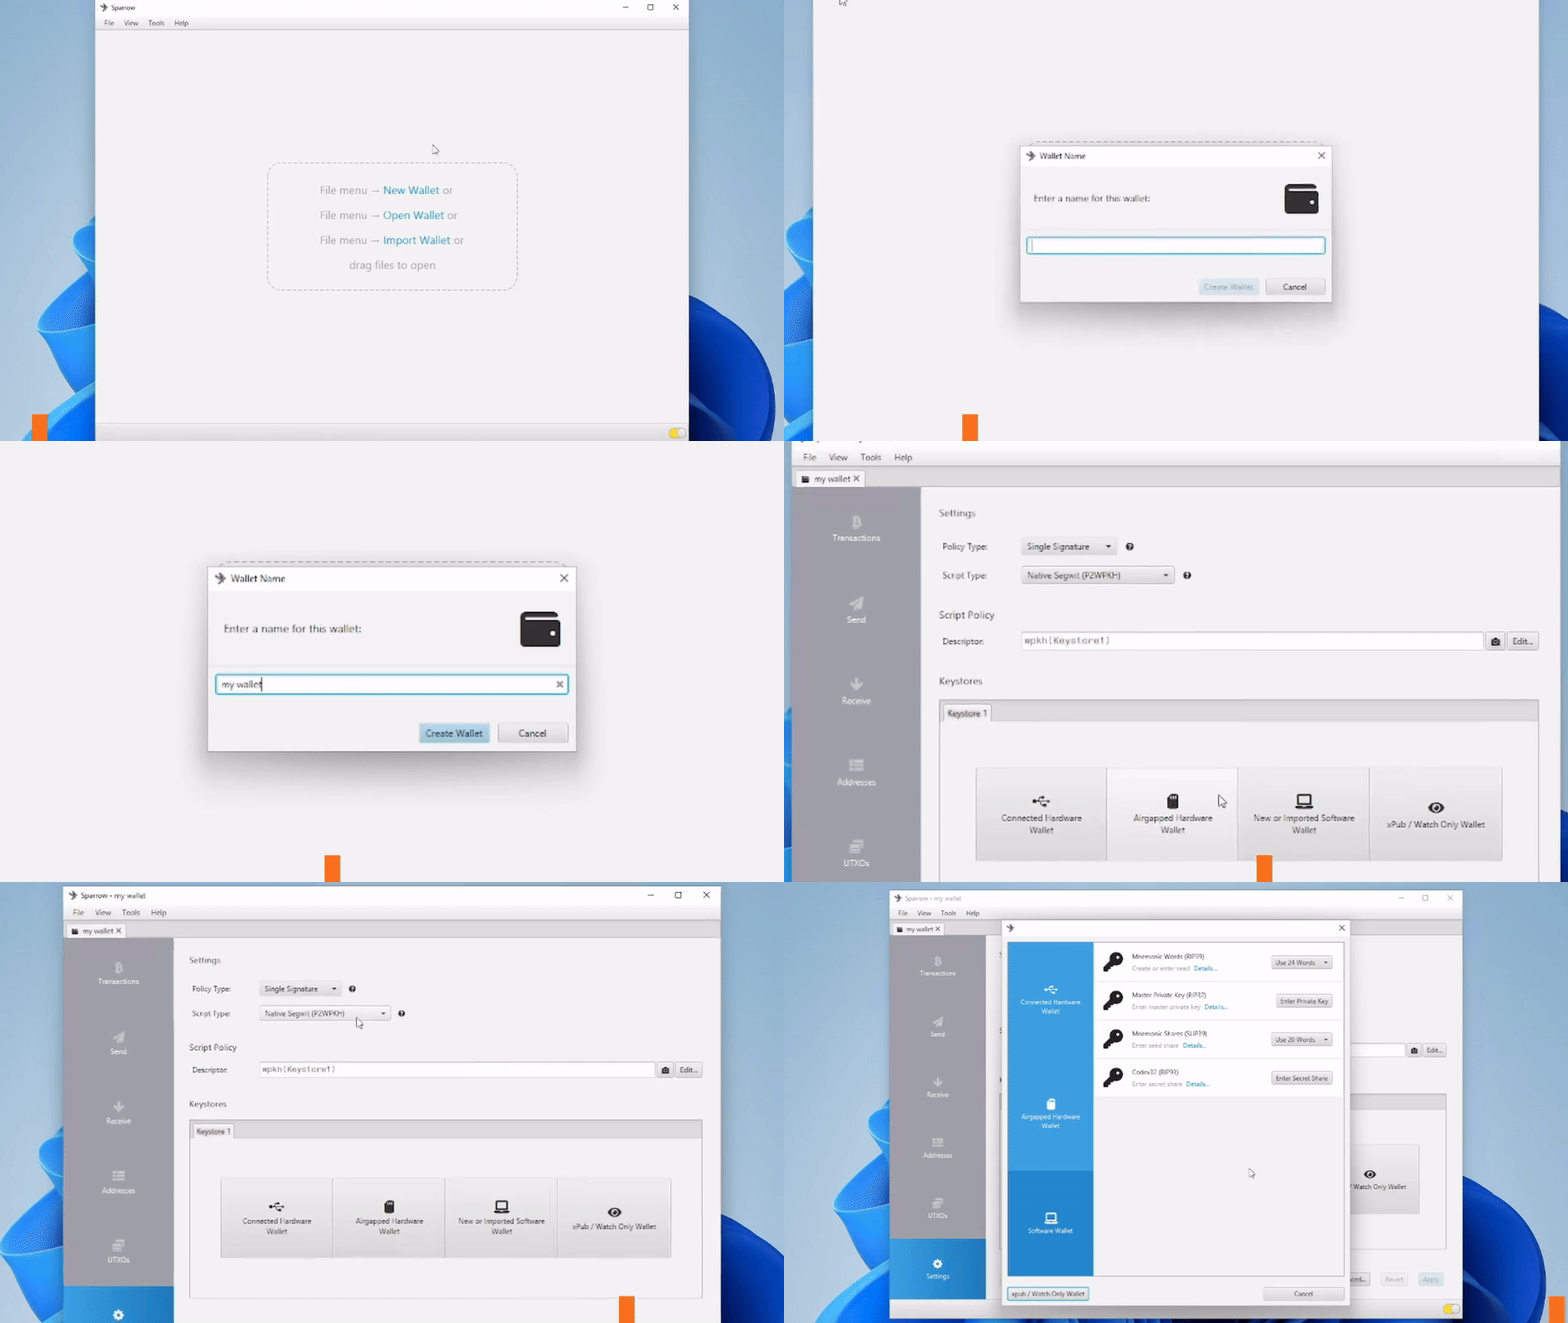
Go to File > New Wallet. Give it a name that makes sense to you.
You will see options for Policy Type and Script Type. Leave both on the defaults. For this guide we are creating a single-signature native SegWit wallet, which is exactly what those defaults give you. Under Keystore, select New or Imported Software Wallet.
Generate your recovery phrase
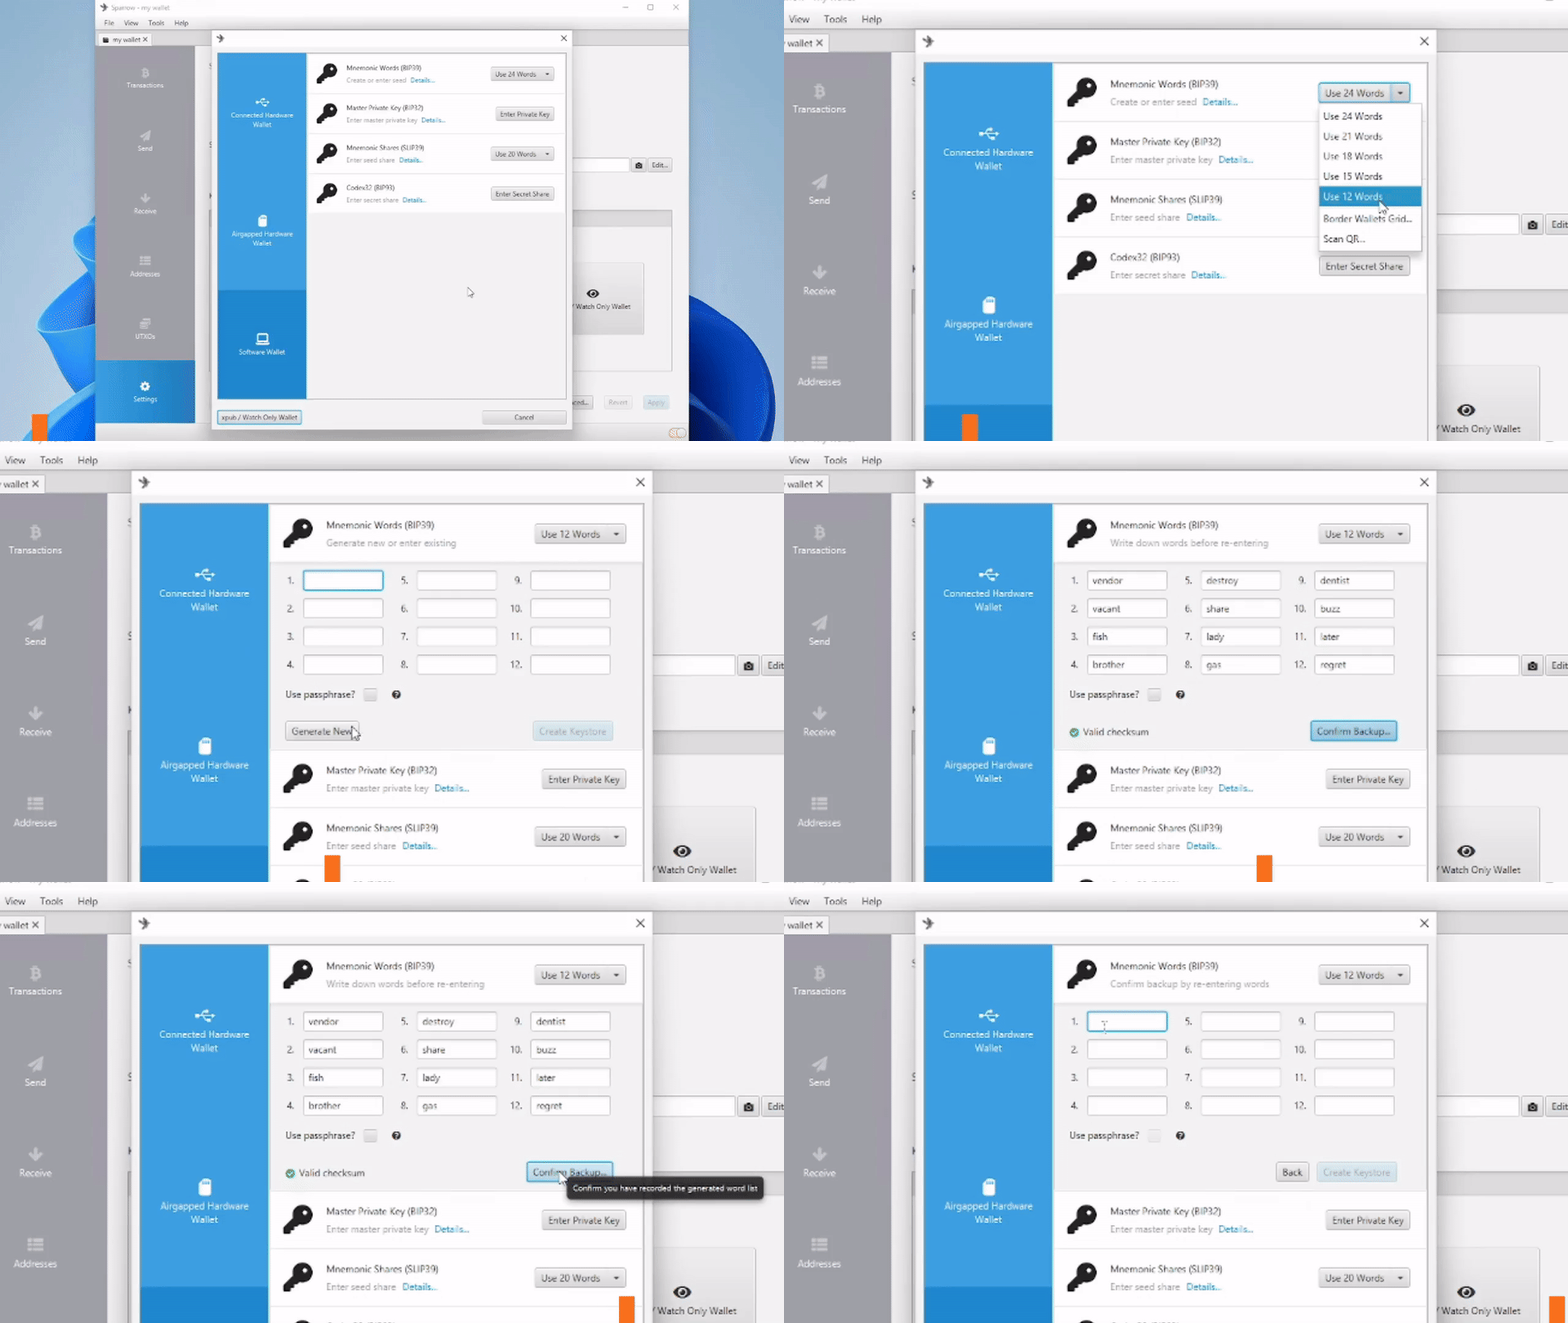
Select Mnemonic Words (BIP39) and choose either 12 or 24 words. Both are secure; 24 just gives you a longer phrase.
Click Generate New and Sparrow will display your recovery phrase. Write every word down on paper, IN ORDER.
> warning
Do not take a screenshot. Do not type it into a notes app. If someone gets this phrase, they get your Bitcoin.
Once you have written them all down, click Confirm Backup. Sparrow will ask you to re-enter the words in order to verify your backup.
Why this matters
That piece of paper is now the most important thing you own. This recovery phrase is the only way to recover your Bitcoin if your computer dies, gets stolen, or catches fire. There is no "forgot password" email. No customer support hotline. No reset button.
If you lose this phrase, your Bitcoin is gone forever. If someone else finds it, they can take everything. Store it somewhere safe: a fireproof safe, a safety deposit box, wherever makes sense for you. Just do not lose it and do not share it.
Apply your wallet settings
After proving you recorded the recovery phrase, press Create Keystore, then Import Keystore, leaving the default derivation path.
You should now be at the wallet settings screen. Everything is already configured correctly from the defaults you chose earlier. Do not change anything, just hit Apply.
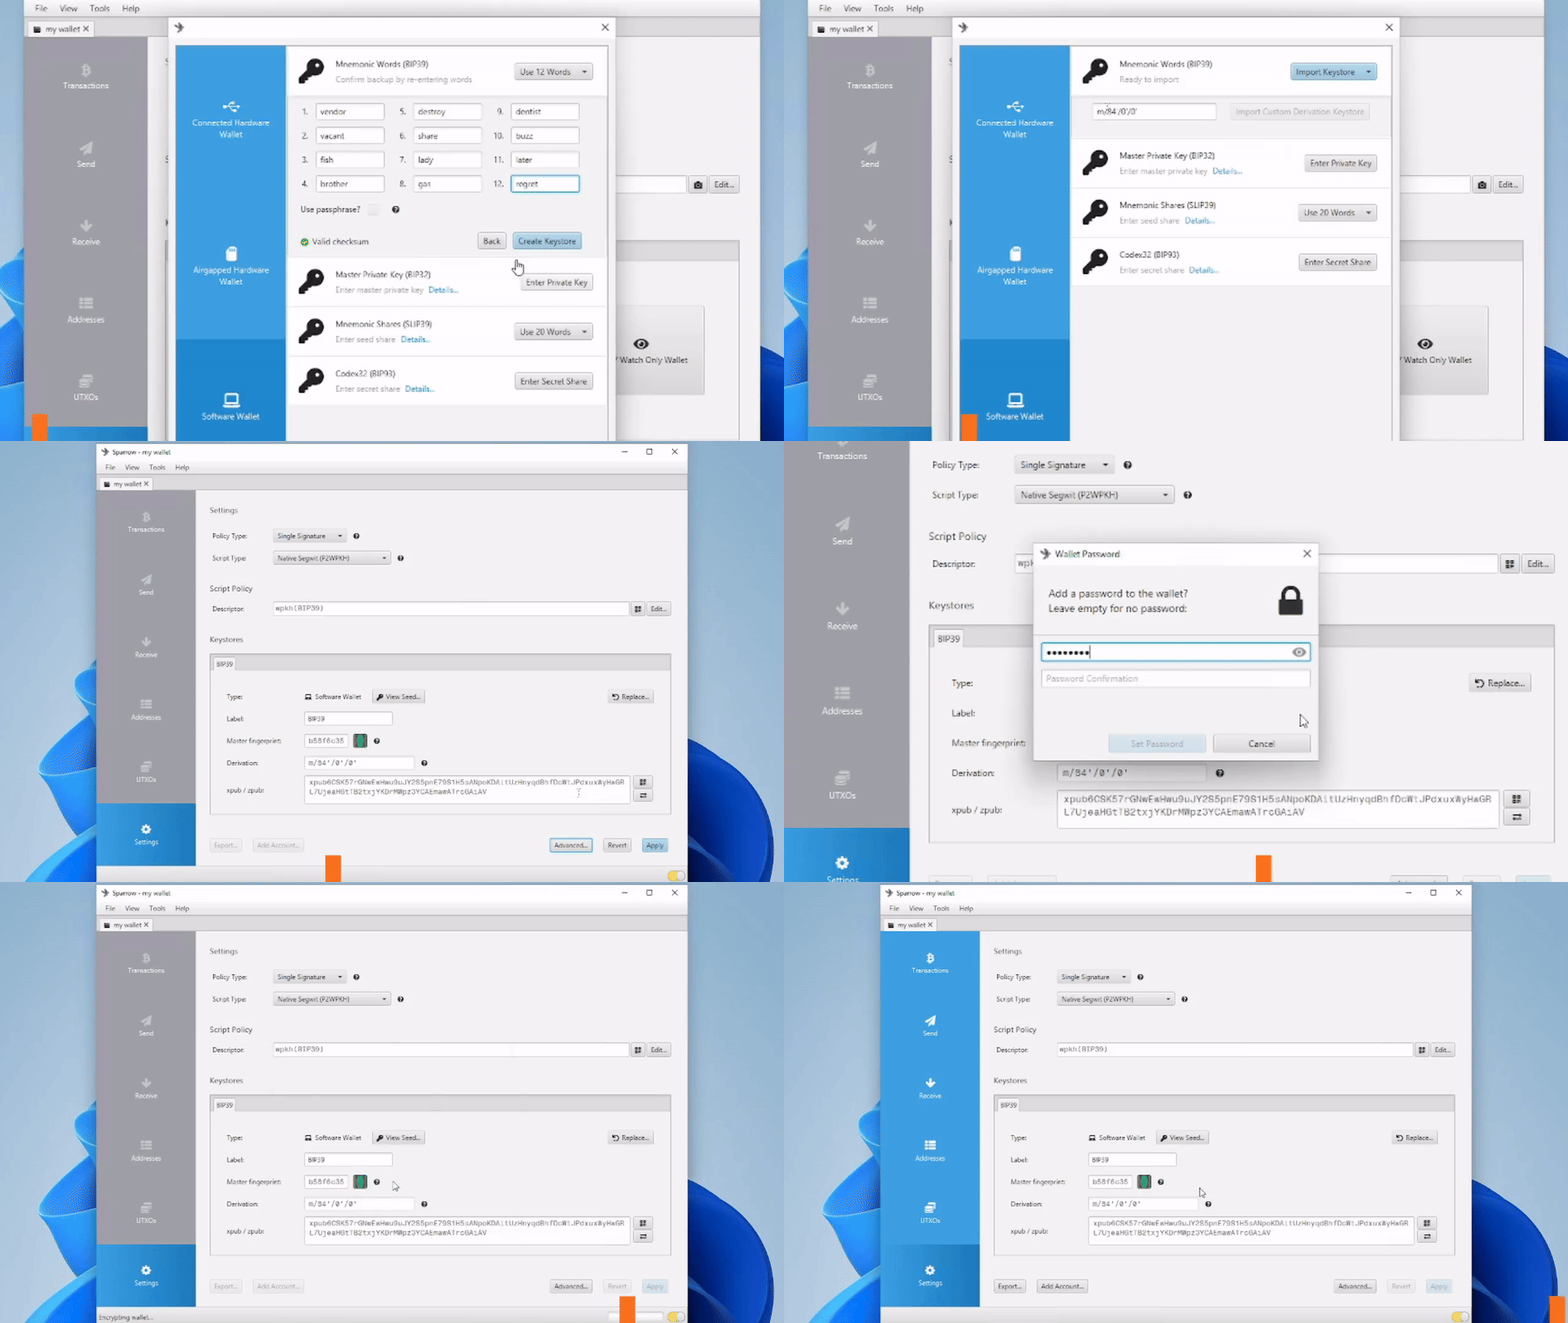
That is it. Your wallet is created and your recovery phrase is backed up on paper. This is your Bitcoin now.
6. Test your backup
Before we move any real Bitcoin to this wallet, let us make sure your backup actually works.
We will do this by recording our wallet's fingerprint, deleting the wallet, and then restoring it from the backup. If we generate the same fingerprint, the backup works.
Record your fingerprint
Click the Settings button on the bottom left side. Write the fingerprint down somewhere, you will need it for the verification step.
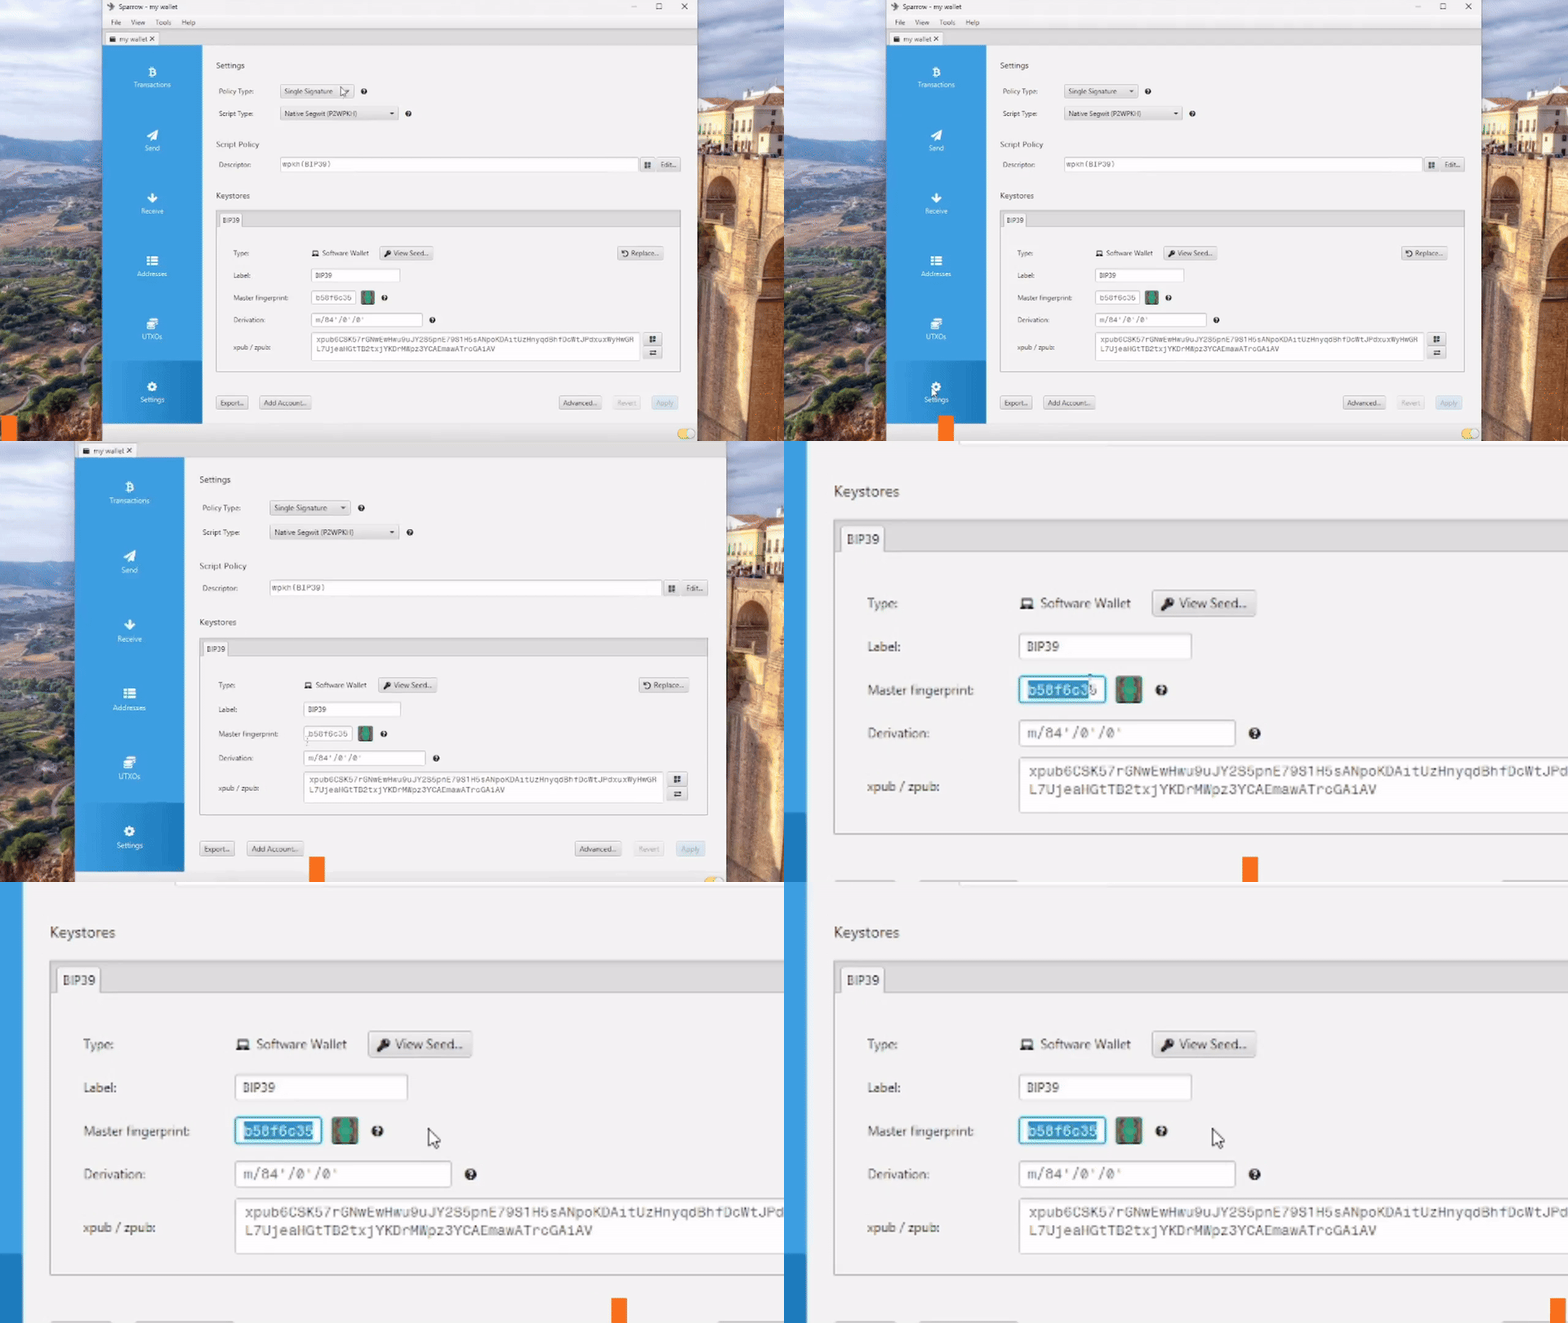
Delete your wallet
Go to File > Delete Wallet, click Yes on the confirmation, then enter your wallet password.
Your wallet is gone from Sparrow, but your recovery phrase is safe on paper. That is all we need to bring it back.
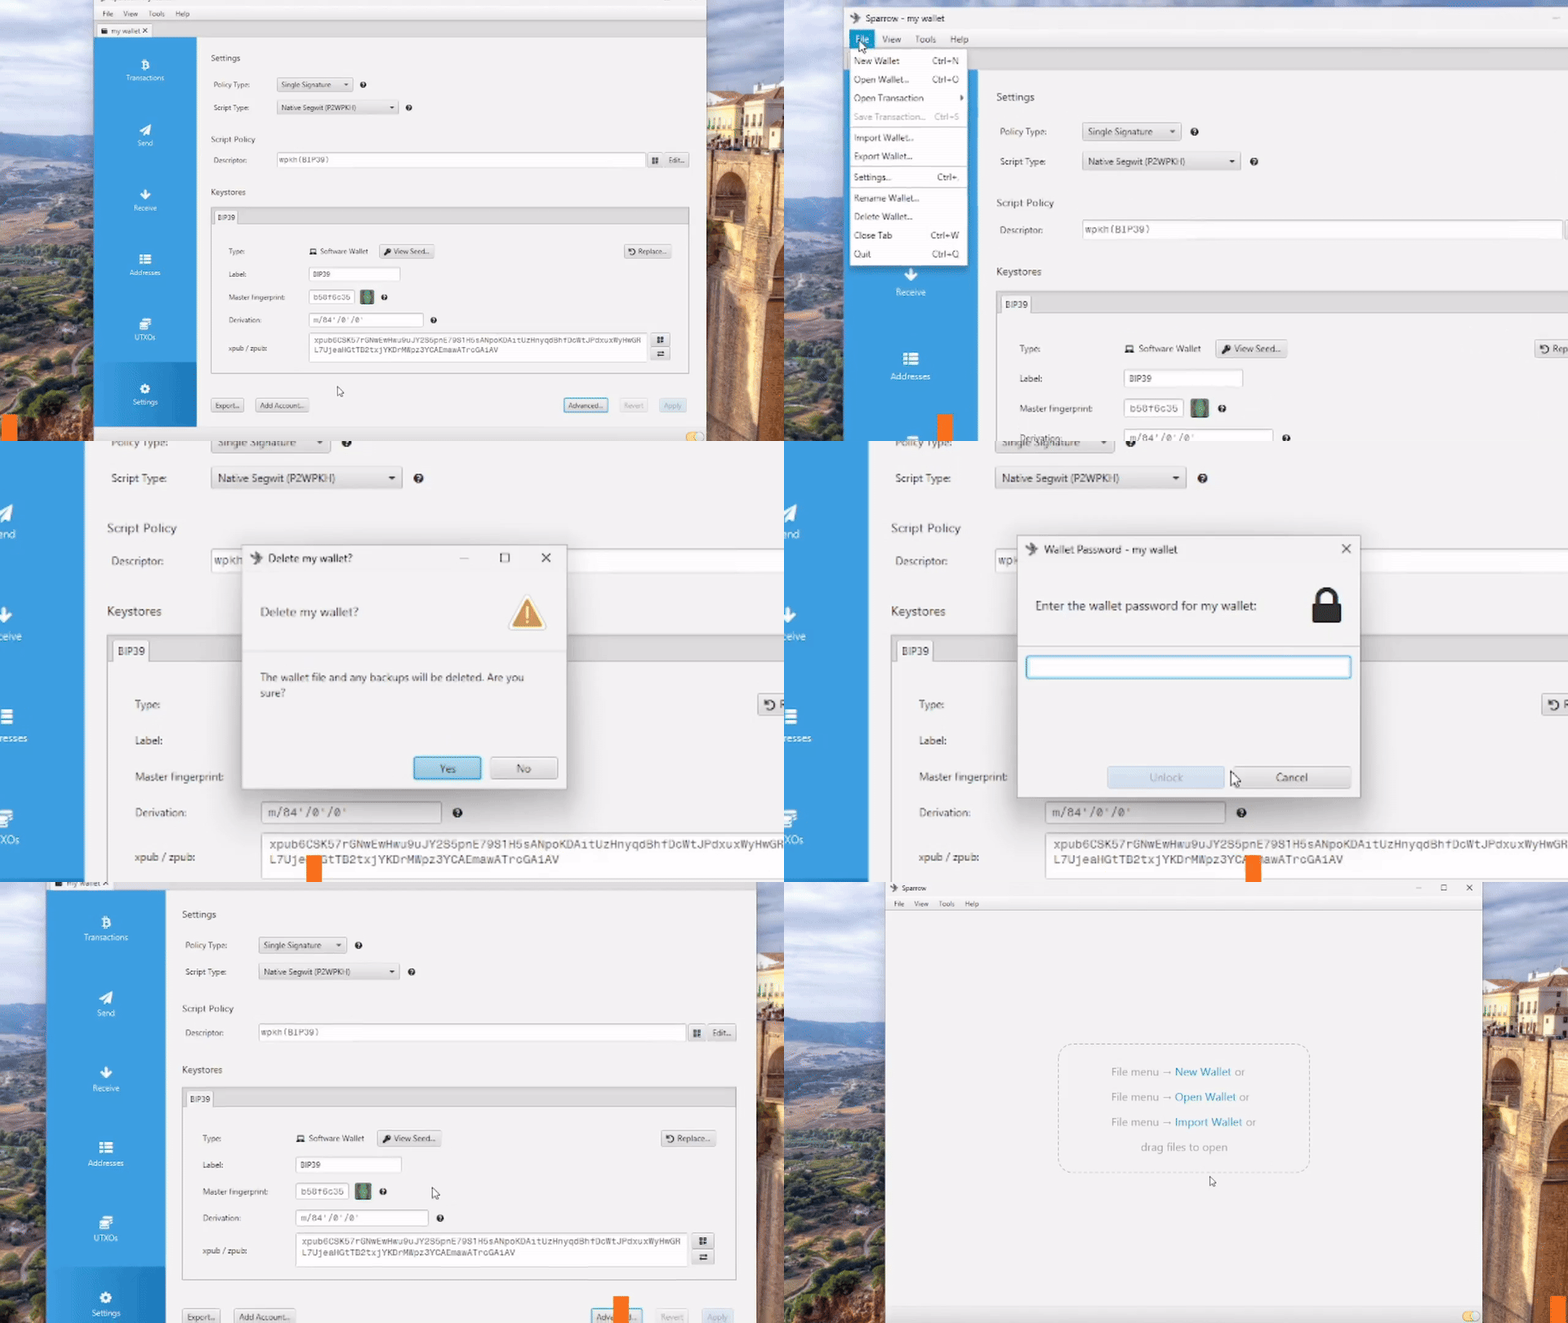
Recover your wallet
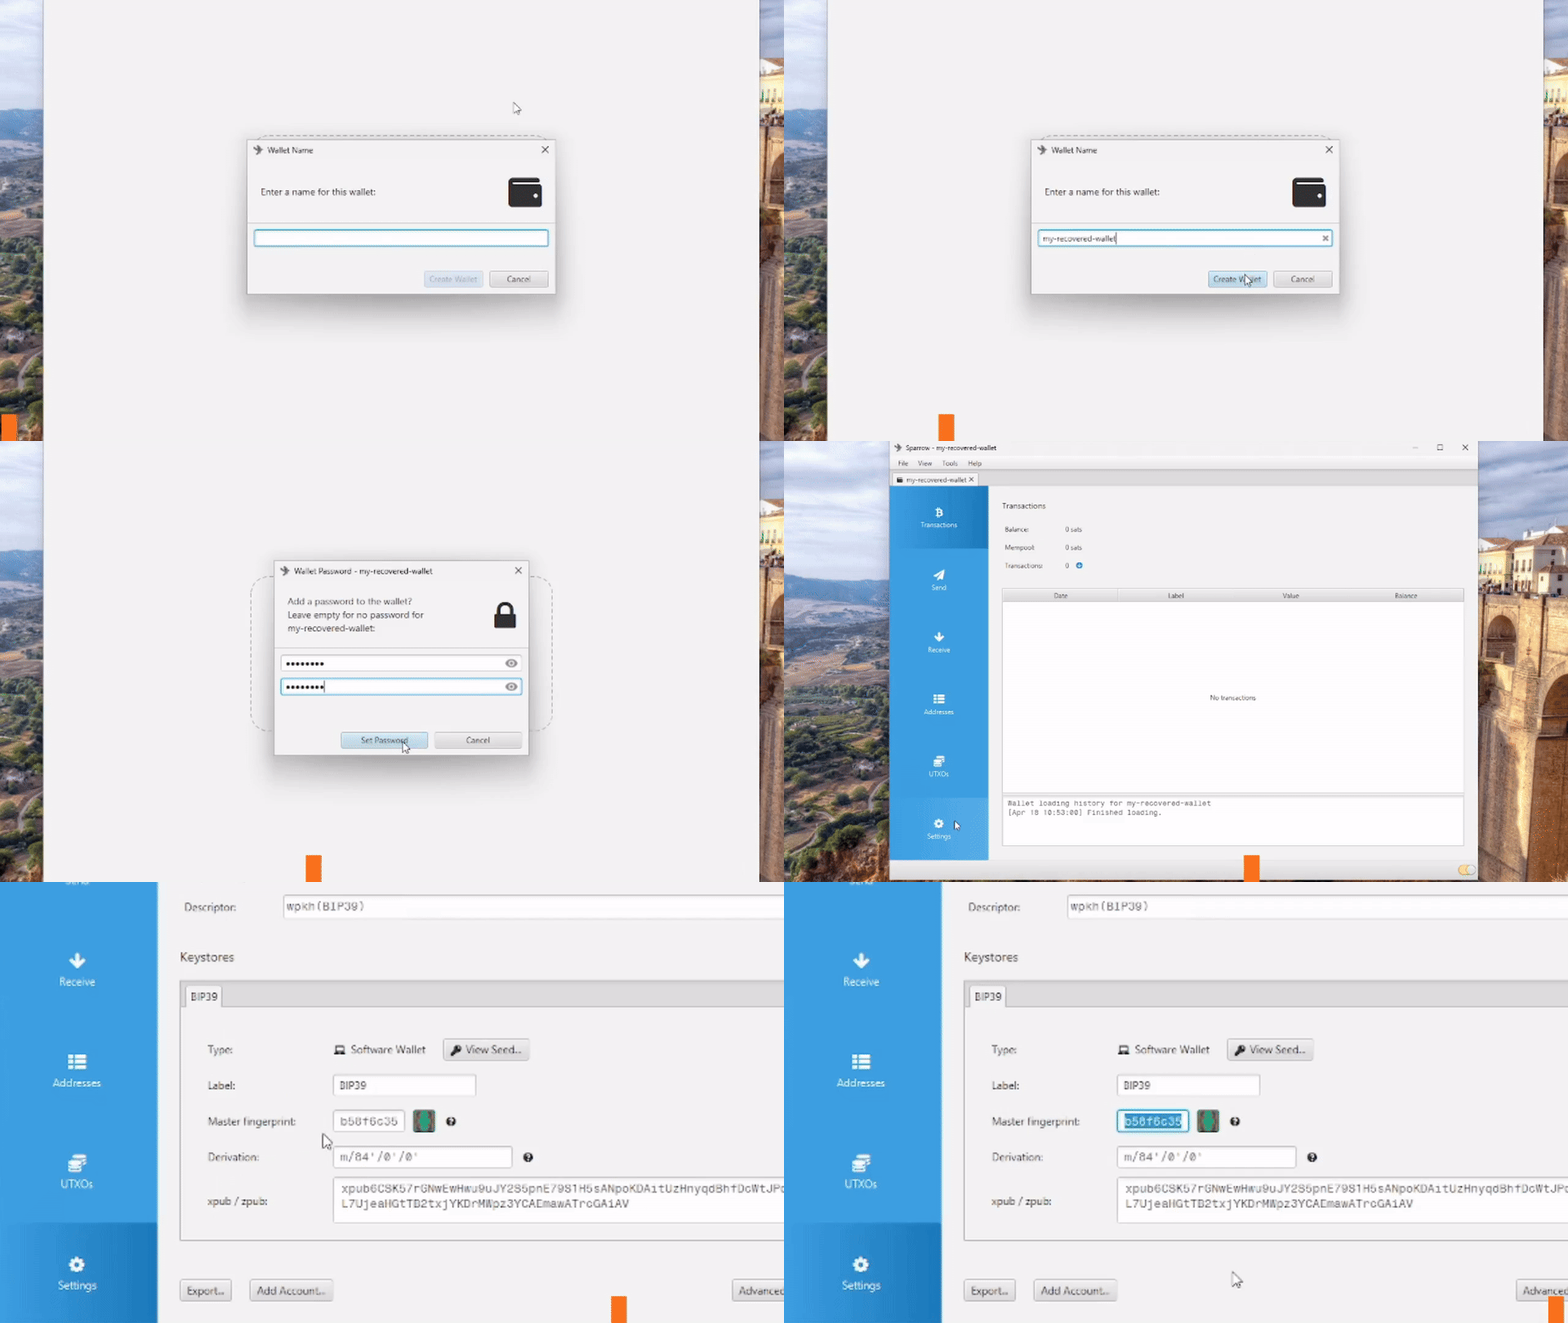
Go to File > Import Wallet. Under Mnemonic Words, select Use 12 words (or 24, depending on what you created). Enter your recovery phrase in order, and leave the passphrase blank if you did not set one.
Press Discover Wallet. Sparrow may show "No existing wallet found", which is expected since we never sent or received funds yet. Press Yes to continue.
Leave the script type as Native Segwit and press Import.
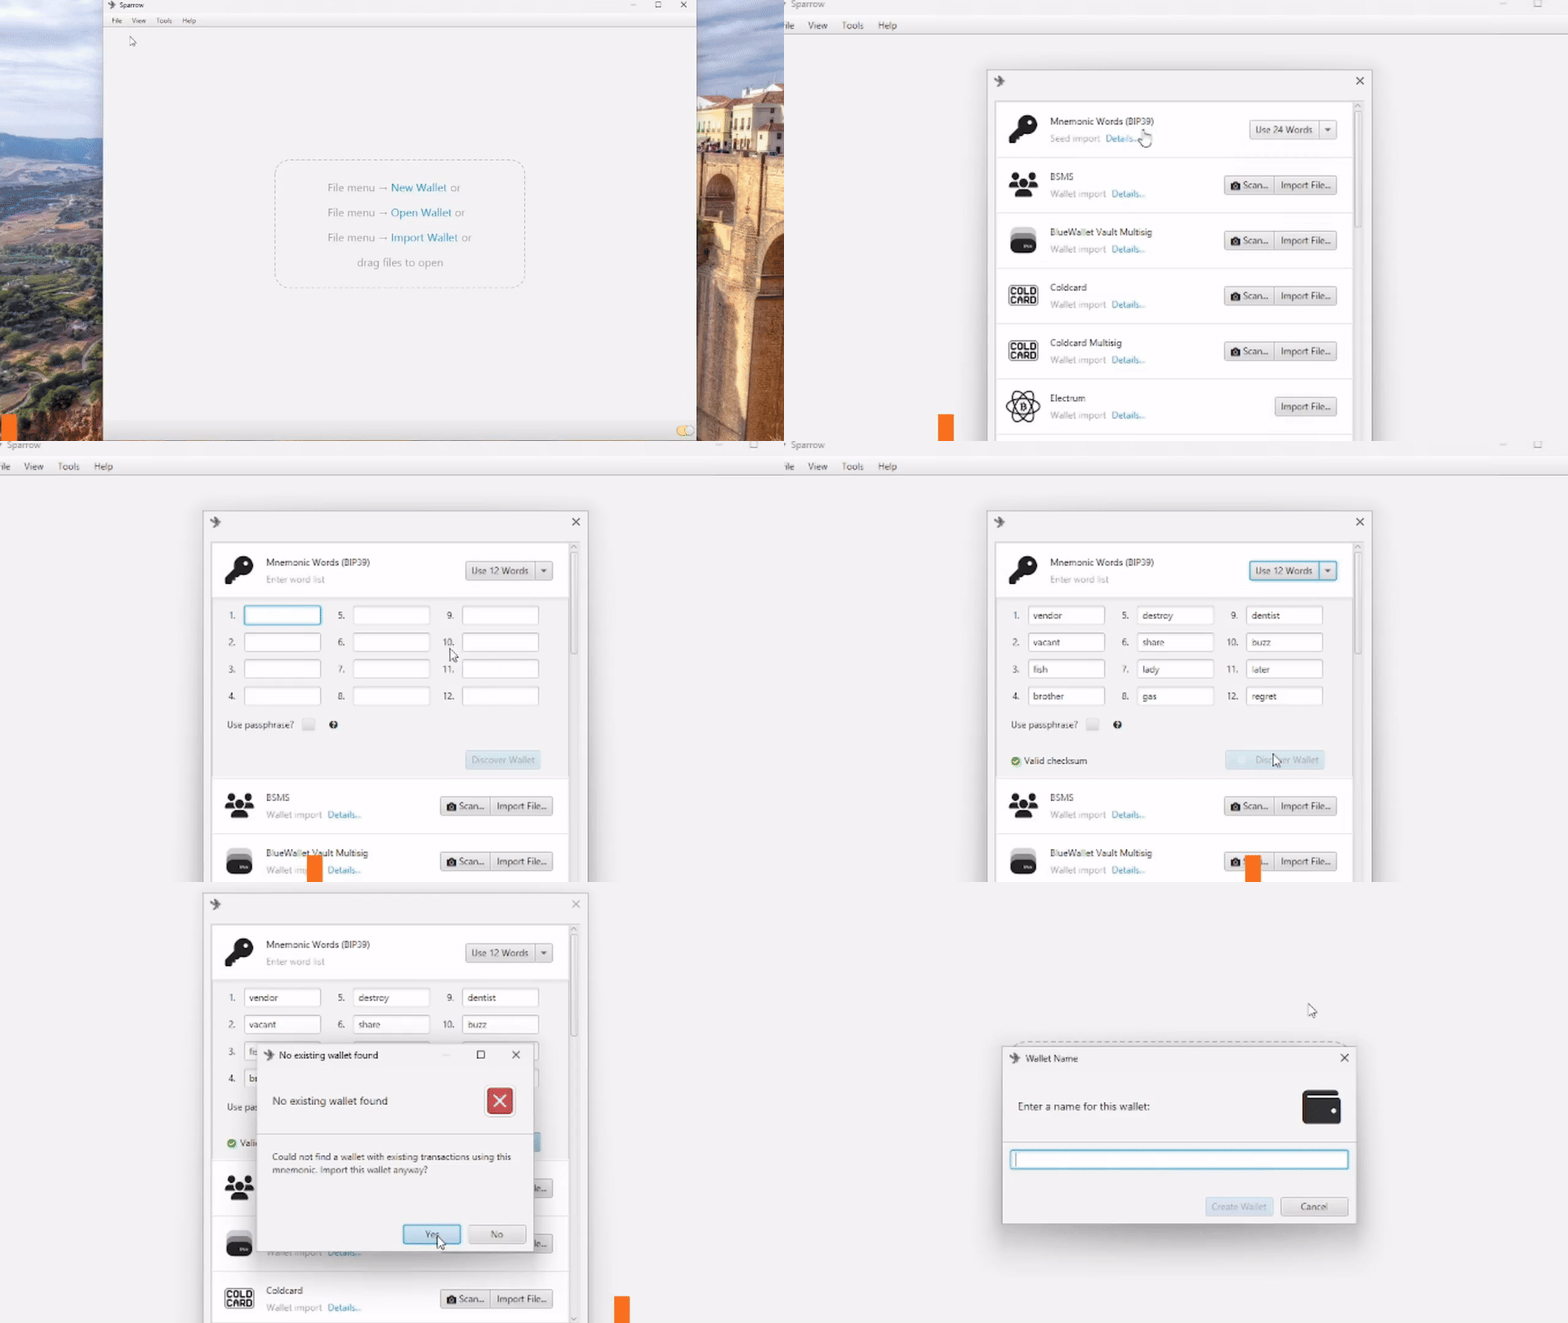
Verify your recovery
Give your imported wallet a name and set a wallet password.
Now go to the Settings tab on the bottom of the left sidebar. Check that the fingerprint matches the one you recorded earlier. If they match, your backup works. Stash your recovery phrase somewhere safe.
7. Test receive and send
Receive Bitcoin
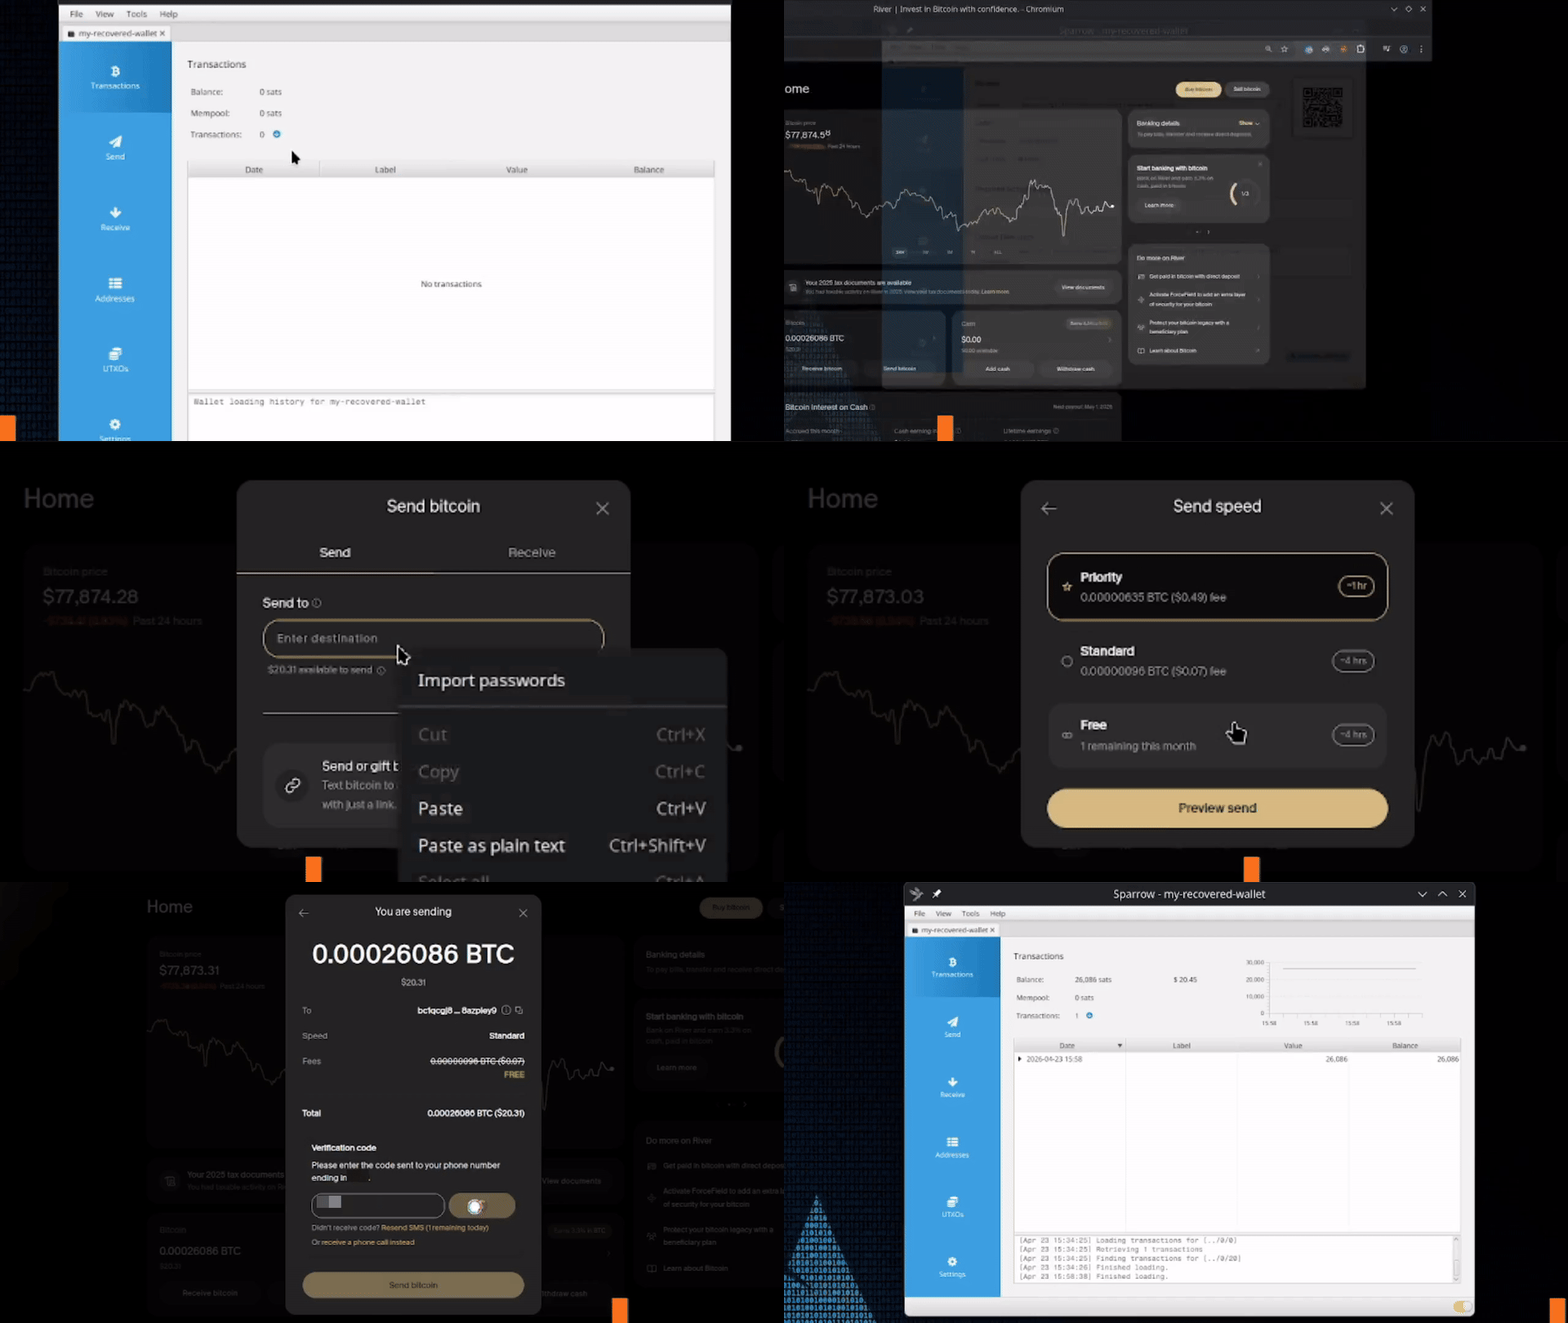
Before sending any real Bitcoin to this wallet, let us test that it actually works. Start by receiving a small test amount.
- In Sparrow, click the Receive tab on the left sidebar.
- Copy the address shown.
- From an exchange you have Bitcoin on, send (or withdraw) a small test amount to that address.
- Wait for confirmation. Your Bitcoin will appear in the Transactions tab once it is spotted in the mempool.
> tip
As a rule of thumb, you should be receiving Bitcoin to a new address every time.
Send Bitcoin
Now let us make sure we can send Bitcoin from this wallet.
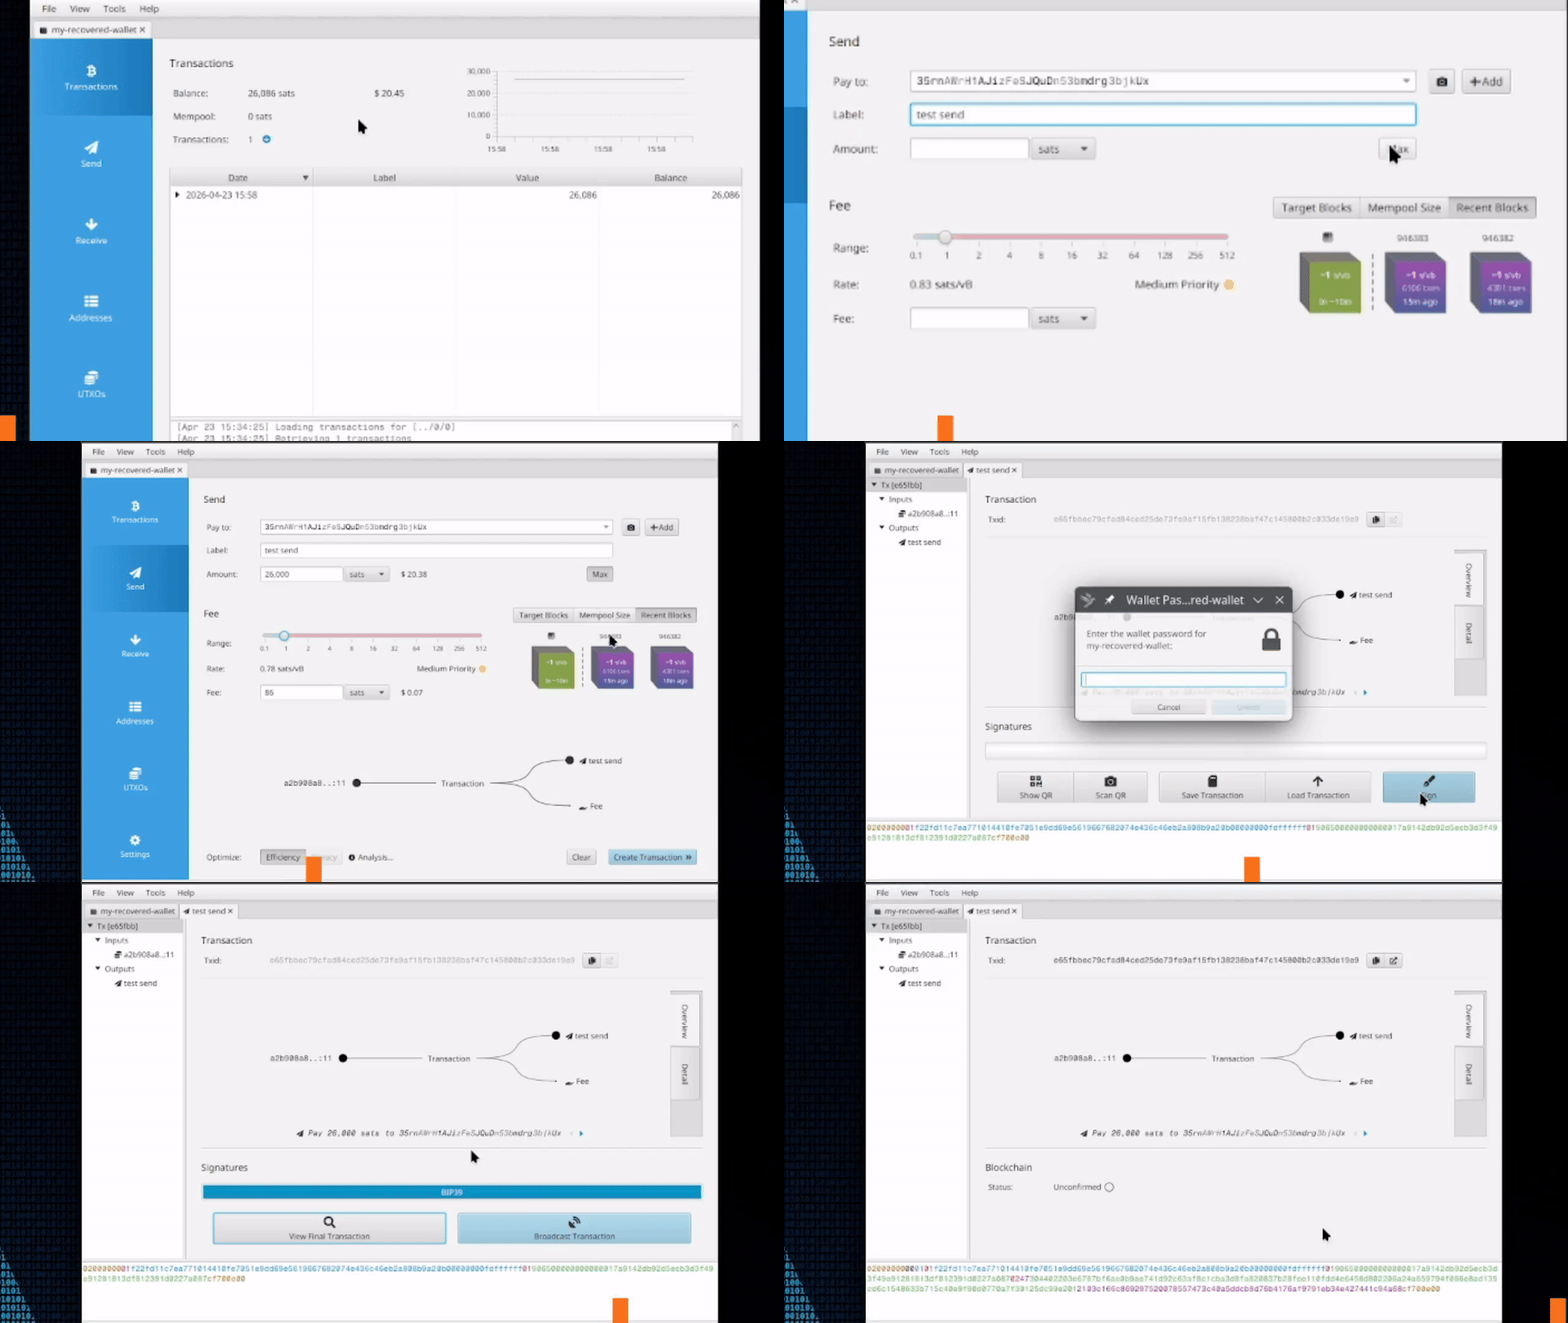
- In Sparrow, click the Send tab.
- Paste a Bitcoin address in the Pay to field. You can send to your own receive address, just make sure it is a new address.
- Add a label (for example "test send").
- Set the amount to send.
- Set the fee rate.
- Click Create Transaction.
- Click Finalize Transaction for Signing.
- Sign the transaction.
- Press Broadcast Transaction.
You just took custody of your Bitcoin
Nice. Now learn the 10 operational practices that help you keep it safe over time, across updates, through the stuff nobody warns you about.
> further reading
> 1-on-1 help
Some of these steps you only get one shot at. Book a session and we'll do it together, on your machine.
Book a Call